Contents
We're open sourcing the infra knowledge graph that powers our AI SRE Agent 👇

Get started with your AI SRE Agent
In this guide, we'll be covering:
Some background: why so many companies (including Aptible) are investing in building an AI Agent to supplement incident response
Some philosophical considerations: decisions we made with Aptible AI, what we’ve built so far, and a few pro tips
A complete step-by-step guide on how to build your own AI Agent, including:
How to set up an application in Chainlit
How to connect your application to an LLM (in this case, gpt-4o)
How to make your Agent faster and add real-time “typing” (similar to ChatGPT)
How to give your Agent a personality and specialization
How to give your Agent the ability to search a collection of files
How to integrate your Agent with external tools (in this case, PagerDuty)
🚨 Coming soon: open source infra knowledge graph 🚨
In the next few weeks, we’re dropping an open source AI-powered infrastructure knowledge graph that will allow you to build even more effective AI agents with access to a real-time map of your cloud infra. Here's how it works:
Pre-fetches data from cloud APIs across services like AWS, Kubernetes, Datadog, etc. so that you’re not making hundreds or thousands of API calls any time you need data.
Models cloud resources, their state, and historical changes as a connected graph, providing the context you need to answer the real questions.
Exposes an MCP server that allows you to build agents on top of real context rather than raw, disparate APIs.
And you’ll be able to install it using homebrew with one line of code.
Why use an AI Agent for incident response?
Incident response is messy. Knowledge silos end up forcing you to rely on a handful of subject matter experts and tenured engineers; SREs waste time on manual investigations during incidents at the expense of high impact work; and all of this leads to more downtime, higher MTTR, and potentially lost revenue. Aptible isn’t the first team to feel those pains, and we won’t be the last. But we’ve found a better way by implementing an AI Agent to act as an assistant to our SREs. Here’s why:
AI is really good at mundane, time consuming tasks like quickly retrieving information from disparate sources, summarizing huge amounts of data, and pattern matching. These benefits — when combined with human instinct, logic, and decision making skills — make AI ripe for augmenting on-call engineering teams during incidents.
At Aptible, we saw the potential here for our own incident response processes and decided to build an AI SRE Agent to help lower MTTR, eliminate knowledge silos, and decrease reliance on our most senior engineers.
We’ve spoken to quite a few engineering leads who are building the same type of tool for their teams, and we can all agree that building any kind of nontrivial AI assistant is hard for several reasons:
Given that AI is still so new, there are few established standards or best practices
Frameworks are changing all the time
So much information online is already outdated (or will be soon)
Because the demand for an AI Agent that actually works is so high — and since we’ve put so much time into building our own already — we’re going to share a detailed explanation of what we’ve built so far, the main considerations we had to take into account, and suggestions on how you can do it yourself.
What we’ve built so far + decisions we’ve made along the way
Is there already a tool for that?
🤔 Considerations: If you don’t need to build something new, then you shouldn’t. There are so. many. tools on the market. And depending on your specific use case, you may be able to find one that works for you.
The impetus for Aptible’s search and eventual development of our own incident response was that we struggled with knowledge silos and had a tendency to rely on three or four subject matter experts any time we encountered an issue with a particular system.
So we started with an open source tool called Danswer to improve information retrieval (similar to its popular commercial competitor, Glean). It plugged directly into Slack and could retrieve answers to natural language questions from various information sources. The problem was that it was limited to indexed data only (i.e., just our docs and our chat history).
⚒️ What we built: What we needed was a tool that could integrate with all our other systems (not just docs and Slack). We needed to retrieve logs and metrics, application health status, and generate reports and postmortems after our incidents were over. So we designed an AI Agent that’s essentially built on a series of integrations that allow you to connect with both real-time and indexed data. More on that later!
💡 Pro tip:
Before you decide to build your own product, look into what’s already available. A great place to start might be crowdsourcing ideas from Reddit (check out this thread, for one) or checking out some of the open source tools out there (here’s a good place to start in github if you’re looking for incident response tools specifically). There’s also a long list of open source AI Agents that you could start using tomorrow.
What’s your integration strategy?
🤔 Considerations: As mentioned above, the biggest consideration here is: what sort of information do you need your Agent to have access to? You could maybe get away with simply integrating it with third-party providers via an API, but if you need the integration to be more specific to your needs then you’ll need to be more thoughtful with how your integrations work.
By carefully considering what you’ll need to integrate with before you start building, you’ll save yourself some headache later on. Do you need your Agent to be able to execute custom scripts to query your databases? Do you need real-time retrieval of logs and metrics, and how will you design the Agent to retrieve that information? Will it return the link to the source? Will it return a chunk of lines of logs that you still have to manually sift through, or will it be able to deduce where the anomaly may be?
⚒️ What we built: At its core, Aptible AI is built on a series of integrations. An integration is more than just a connection to a third-party provider, it’s also a collection of configurations that are unique to how our team uses that provider. For example, Aptible AI supports multiple integrations for the same provider since we may want to use that provider in different ways. Different teams use Datadog differently and care about different metrics or use different tags, so each team can use the integration to the same tool in the way that they need.
Aptible AI supports a range of common SRE tooling, including:
Chat and other highly synchronous communications
Documentation and other knowledge repositories
Observability
Alerting
The actual implementation of these integrations fits into one of three categories of customizability:
For starters, you have a basic integration that requires no customization (PagerDuty is one example). Since it’s just pulling data from PagerDuty and adding it to the AI’s context, every single team that leverages the PagerDuty integration uses it in the same way.
Next, we have more customizable integrations (like the Datadog example from before) that are built on top of a generic InfluxDB integration but customized to the specific use cases of looking up container metrics and looking up restart activity.
Finally, there are fully custom tools that would likely make no sense to anyone outside of Aptible (an example here would be our integration that gets containers for an application). These are entirely specific to how we run our infrastructure and can be implemented either by a lightweight PubSub interface or a websocket-based “safe” proxy.
💡 Pro tip:
Less is more! If you give the model too many tools to choose from, it can start choosing incorrect tools and confuse itself. More on that in the next section
Speed vs. quality — what’s the right balance?
🤔 Considerations: So, first of all, no one wants an AI Agent that takes ages to respond. It defeats the whole purpose of building an Agent in the first place if you could do it faster yourself. There are two things to consider here: first of all (and we’ll get into this more in the next section), tweaking your prompt to ask the agent to be more brief will help to speed up your Agent a bit; secondly, you could consider using a faster model like 4o-mini, but you may be sacrificing a bit on the capabilities side (which might be fine, depending on your use case).
It’s also important to keep in mind that you must show the user that the bot has gotten the request and is working on a response (otherwise, they may get frustrated or confused and stop engaging). In the step-by-step lab below, we’ll show you how to enable real-time typing to indicate to the user that the Agent is about to respond (similar to ChatGPT, as you likely know). However, because we originally built Aptible AI as a Slack integration, we’ve been limited on how we can show that the Agent has seen the request and is working on gathering a response.
⚒️ What we built: We’ve spend a lot of time tweaking the prompts for Aptible AI (again, more on that in the next section) to ensure that it can respond quickly and effectively. As for the Slack integration, since we can’t show live typing, we tell the Agent to react to any question that it will react with a 👀 to indicate that the Agent has seen your request and is working on a response. We made sure to send that reaction as fast as possible to give our users confidence that we’re handling their request.
💡 Pro tip:
The model that you choose will impact speed; it’s important to strike the proper balance between speed and capability. Here is a detailed breakdown of the quality, speed, and price of leading LLM models to get you started.
So many models, how do you pick one?!
🤔 Considerations: Here’s the thing with models… new ones pop up every day, and there are several considerations to keep in mind when choosing one (mainly to do with your specific use cases). Should you self-host? Do you need your Agent to be conversational or task-based or both? Will it be conducting simple or complex tasks? Do you need real-time performance?
There’s no need for us to go through all the models that exist since that content is already all over the place (if you want a deep dive, this is a great resource), but we can walk through the decisions that we had to make when building Aptible AI and the options we considered.
It’s a tricky process because you can’t really avoid tradeoffs. If you need your Agent to conduct complex tasks, then you’ll have to sacrifice a bit on speed and cost.
The model’s size, capability, and architecture depend heavily on whether the tasks require simple classification or highly complex reasoning and interaction. If simple, a smaller, lightweight model like a decision tree, random forest, or simple neural network would suffice. If more complex, then you may consider a more powerful model like GPT-4, BERT, or a similar transformer-based architecture.
If you choose to self-host to avoid the security headache, you’ll likely have to sacrifice on features and functionality since your self-hosted version will lag behind the hosted options.
If you need your Agent to be trained on domain-specific knowledge, then you’ll need to curate or create your own datasets for fine-tuning. See if you can get away with using a pre-trained model that’s already been trained on large datasets to avoid the data quality issue (though this may be impossible depending on the data you need your Agent to have access to).
⚒️ What we built: We’re currently using GPT-4o for Aptible AI because we believe that it’s most likely to give us the highest quality answers. However, we recognize that customers using Aptible AI may want to use their own models (including self-hosted models). As such, we’re keeping that in mind as we build.
💡 Pro tip:
Your Agent will only be as smart as the information that you give it. LLMs need help understanding how and when to use the information you give it, and if you don’t give it instructions on how to interpret information, it’ll just make something up. Spend real effort upfront curating the information you feed to your LLM!
What about prompting techniques?
🤔 Considerations: You might be tempted to retrieve as much data as possible (documentation, Slack conversations, code repositories, issue trackers, etc.), throw it all at a RAG application**,** and ask it questions. But in our experience, there’s almost always going to be too much noise for this to be useful. That’s where prompt engineering comes in.
We’ve alluded to this already, but prompt engineering is a critical piece of the puzzle here (for a great overview on prompting techniques, check this out). The better your prompt engineering, the better your Agent will be.
For context, here are a few that we considered (over time) when building Aptible AI:
Zero-shot prompting: this is what most people do when they talk to ChatGPT; they just ask it a question then they get a response. If the response is bad, then they just ask the question differently.
Few-shot prompting: this is what slightly-more-experienced people do when talking to ChatGPT; they ask it a question and include examples of the output they want. You might use zero- and/or few-shot prompting for very simple tasks that the underlying model already knows how to do.
Retrieval Augmented Generation (RAG): this is a technique that allows the model to retrieve additional context and use it to answer the question. This is particularly useful for AI-powered document search (see also: Glean and Danswer).
ReAct: this technique allows an agent to generate “thoughts” and take “actions” in an iterative way to solve a problem, most similar to human reasoning. ReAct is great for moderately complex problems, like navigating references through documentation and tools in real time to compose an answer.
An important thing to keep in mind is that you can mix and match with these techniques (we’ll cover the multi-agent approach next). Here’s what we did…
⚒️ What we built: Because Aptible AI has a multi-agent structure (more on that later), we’ve implemented a mix of ReAct and RAG depending on the complexity of the task/question.
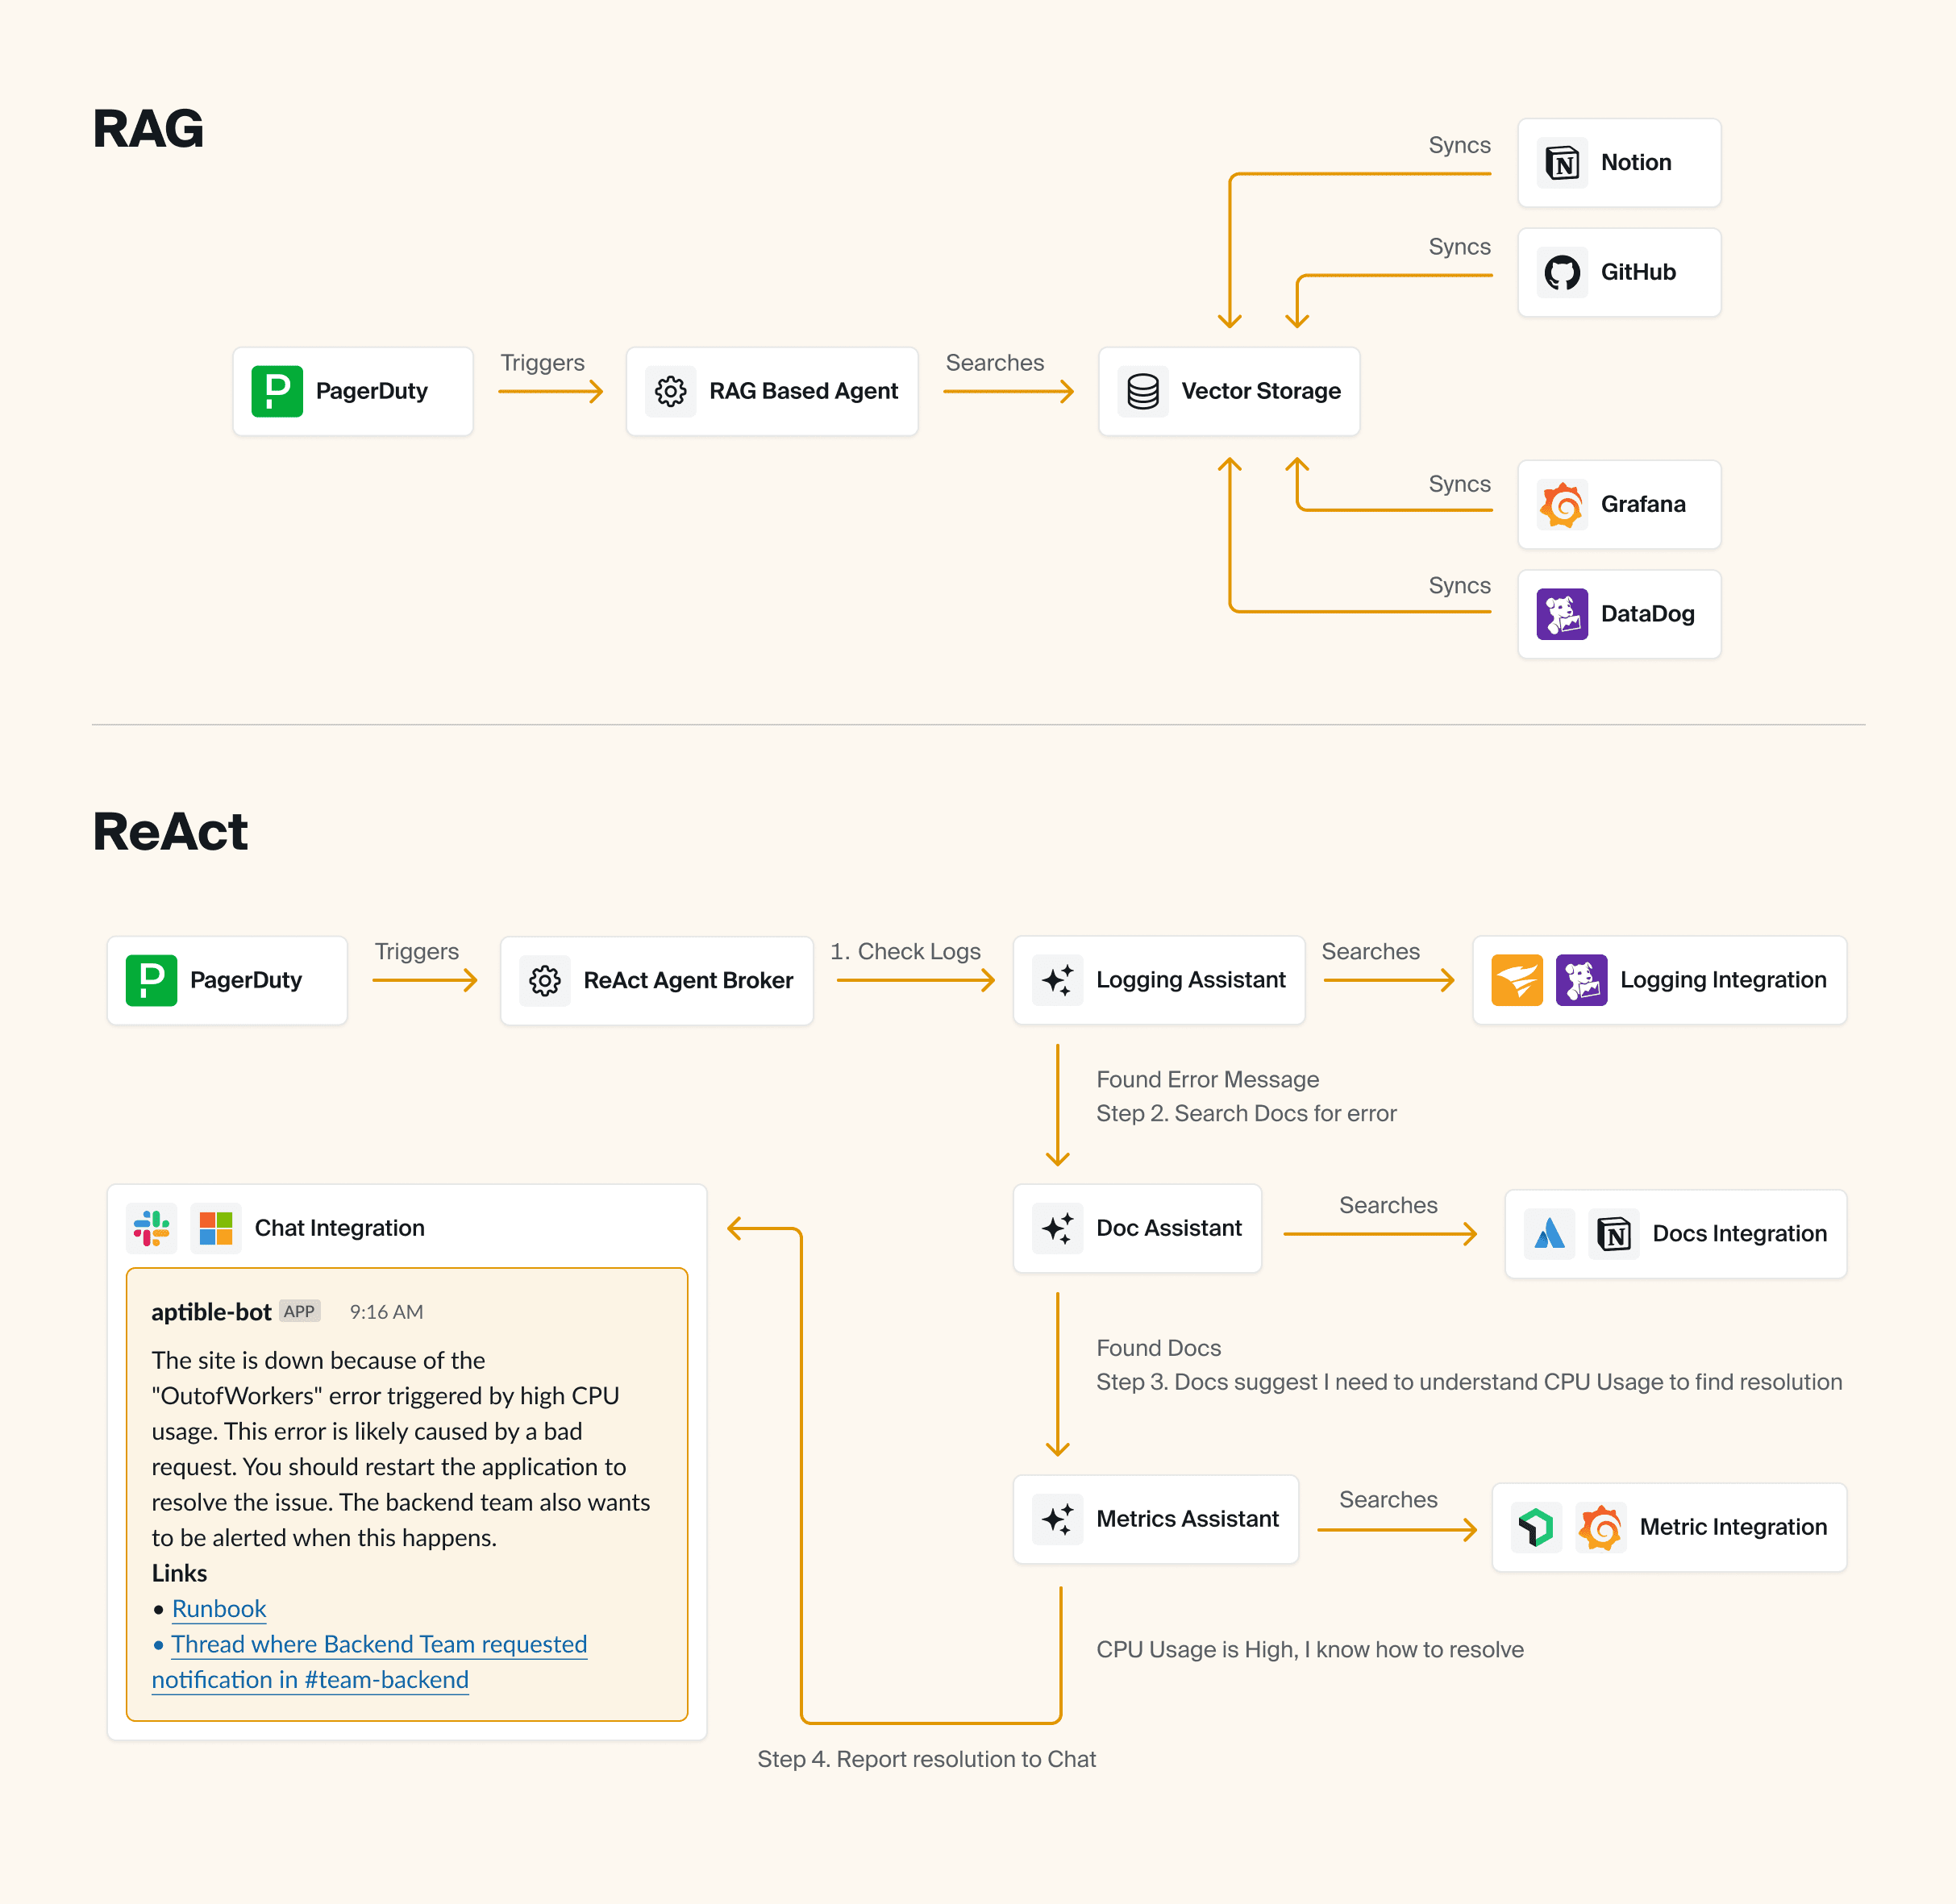
So when you ask the AI a question, we hand off all of the integrations (with instructions on how to use them) to the AI. The AI then makes decisions about what tools to call based on the information it has available to it. After each integration call, the AI has the option of deciding it has enough information to provide an answer, or deciding that additional integrations are relevant and could potentially yield additional information.
Throughout the process, we’re trying to help the AI make better decisions about what integrations to leverage via a few different mechanisms:
Extensive prompt engineering for the integrations, to make sure it’s really clear when and how to use each integration, as well as how to interpret the output.
We’ve built a self-rating system that asks the AI to self-rate the value of the response from an integration. Even when the AI makes a dumb decision in calling a integration (or provides bad inputs), it’s typically able to recognize that after the fact if you ask it to self-rate whether or not the output of the integration was useful. We can then use that to influence how much a specific output factors into a response. We can also block the AI from proceeding if it’s consistently making bad decisions.
We’ve implemented Naïve Bayes based on past experience. For example, if most of the time you call integration A and then B, and that yields useful results, it’s probably useful to continue doing so. The Agent can also use things like comparing to previous similar incidents to further narrow what integrations are useful, and when, in specific scenarios.
💡 Pro tip:
To avoid nonsense answers that sound correct but aren’t, be sure to take a step back and consider where your most useful information typically comes from for the problems that you’re trying to solve with AI – then design your Agent based on that.
Multi-agent or single agent?
🤔 Considerations: Multi-agent approaches are becoming more popular, but they can be complicated and potentially unnecessary depending on your use case. It can be quite useful to have a team of agents working together with different techniques to solve complex problems.
For example, if you ask your bot a question in Slack that has nothing to do with your specific infrastructure (maybe you just want to know who won the World Series in 1995), you could have an Agent built on zero-shot prompting to simply act as a ChatGPT that’s integrated with your Slack (or wherever you have it).
But if your question or need is complex, it would be useful to have a team of Agents that basically act as your little research team, gathering and analyzing data from disparate sources in an intelligent way.
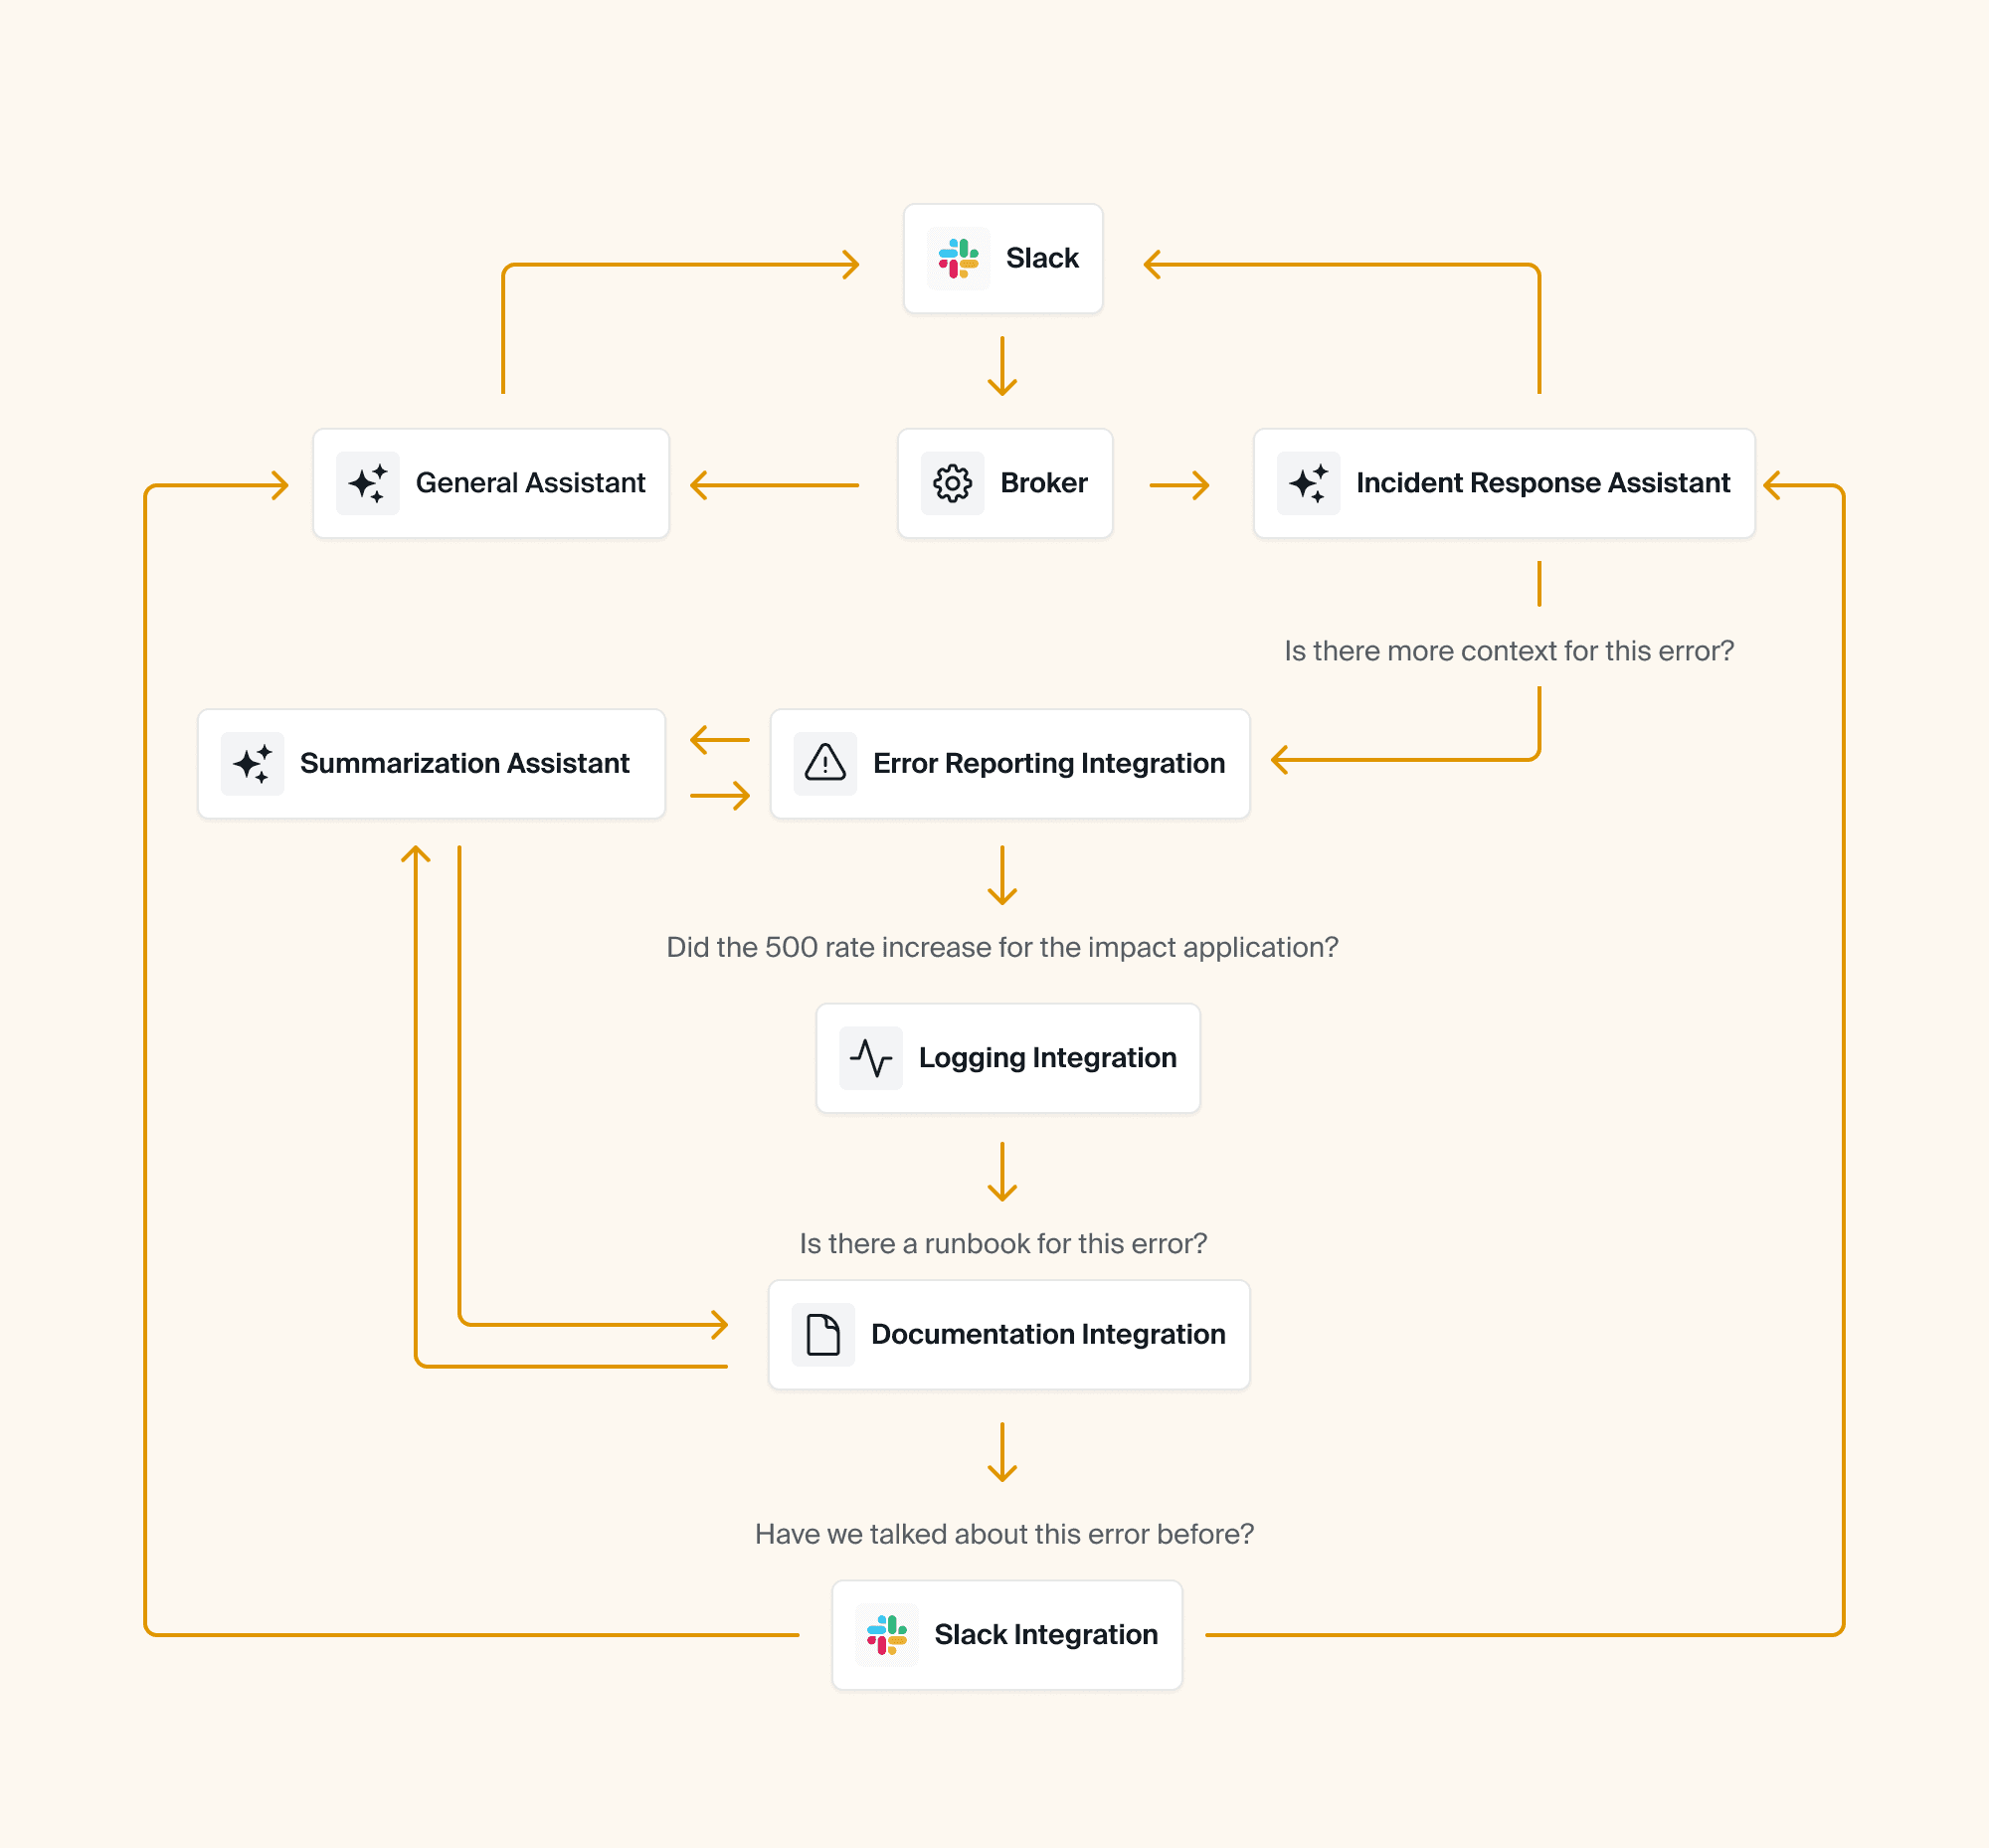
⚒️ What we built: Aptible AI uses a multi-agent approach, starting with a broker Agent that determines what type of question or task needs to be addressed.
💡 Pro tip: It’s easier to refactor into a multi-agent approach than out of it! So make sure you need it before you start building your Agent that way.
What do you want your bot to specialize in?
🤔 Considerations: In the same vein as making your agent fast, you also have to consider exactly how you want to customize it. This not only means determining how much information it needs to have access to (which will affect speed and quality), but it also means giving it a personality if you’d like 😄
Just like a human, your Agent has to specialize in the problem(s) you're trying to solve in order to be most useful and avoid spewing incorrect or misleading information. This means adjusting the system prompt. What you need to consider here is: how strict do you want your system prompt? Do you want your Agent to try to answer as many questions as possible? Or would you prefer that it outright denies any questions that it won’t be certain about? You could even design it to express uncertainty so that it doesn’t sound too authoritative and lead to confusion or distrust among your engineering teams.
⚒️ What we built: Our system prompt is very strict — Aptible AI outright refuses to answer questions that aren't related to incidents in order to mitigate the possibility for wrong answers or hallucinations.
💡 Pro tip:
If your implementation is sophisticated enough, you could consider customizing your Agent’s behavior based on who it’s talking to (i.e., you can ask it to be more socratic and verbose for junior team members to help them learn, or to be more terse and to-the-point for senior engineers, etc).
Ok, let’s jump in! Below, you’ll add speed and personality to your Agent, giving it the ability to type in real-time and testing out a few system prompts to show how your prompt engineering affects how the Agent responds.
What information should my Agent have access to?
🤔 Considerations: Before you start feeding your LLM all of the information you can possibly find, think strategically about what exactly you want the Agent to be able to do and what its purpose is. Later on in the guide, we’ll show you how to give your bot the ability to search a collection of files effectively. Just keep in mind that the more information you give it, the trickier it can become to maintain high levels of accuracy.
🛠️ What we built: Aptible AI was built for the very specific purpose of helping our SRE team and on-call engineers to debug and resolve production issues faster. So we’ve given it access to our runbooks and other documentation and we’ve designed it to gather and surface as much relevant information about the incident as it can. It then returns the data to Slack in a dynamic dashboard for our engineers to then investigate.
We’ve found that by simply surfacing the information quickly, the Agent provides instant and consistent value versus trying to answer every single question (thereby increasing the likelihood of AI hallucination).
💡 Pro tip:
Resist the temptation to just plug the LLM into your existing search infrastructure! It may seem simpler, but LLMs perform better if you allow them to search semantically (i.e. using vectors) instead of trying to come up with keywords it thinks might be relevant.
Can’t forget about security…
🤔 Considerations: Here’s a topic that comes up a lot when we chat with Aptible AI early users. Most engineering teams eventually have to face their security team when it comes to implementing new tools, and it’s critical to ensure that the data is safe (especially if you’re working in a highly regulated industry). So the first thing you have to do is to know your organization’s AI security policy, then there are a few things you can do to protect against potential data leaks or external threats.
⚒️ What we built: For starters, we use a model that doesn’t train on our data. We're still doing a lot of discovery around what customers need regarding security, whether that's self-hosting or something else! Stay tuned.
💡 Pro tip:
Be careful with the data you give your AI access to or include in prompts, especially if that data shouldn’t be shared with the end user! If you need to include unpredictable data like logs, consider using at tool like Nightfall to ensure what’s passed to the LLM and end users is sanitized
Oh, and of course, it needs to be usable!
🤔 Considerations: How do you plan to use your Agent? Does it need to have a UI? Will it be used across the organization?
You likely don’t need to spend time reinventing the wheel when it comes to the UX around your bot. Frameworks like Chainlit, Gradio, and Streamlit give you out-of-the-box tools for building user interfaces and/or integrating with your other workflow tools like Slack. Use one of these tools to start so that you can focus on getting good answers out of your Agent!
⚒️ What we built: Because our Agent was built specifically for incident response — and because we handle incidents within Slack — we mainly use Slack as our UI. It has its limitations, though, so we do our best to work around them (i.e. instead of showing that the Agent is responding by mimicking typing as seen in ChatGPT, the bot instead react to the question in Slack with an 👀 emoji). We also designed a web UI for configuration, reporting, auditing, and analytics.
💡 Pro tip:
Be sure to keep your LLM code as decoupled as you can, so that you can easily refactor away into another UX if the need arises.
Okay, let’s move on from the theoretical talk about models, techniques, and frameworks! Time to get your hands dirty and start building your own Agent.
Hands-on lab: A step-by-step guide on how to build your own Agent for SRE Teams
In the following lab, we'll show you how to:
1. Set up an Agent in Chainlit
2. Connect your Agent to an LLM (in this case, gpt-4o)
3. Make your Agent faster and add real-time “typing” (similar to ChatGPT)
4. Give your Agent a personality and specialization
5. Give your Agent the ability to search a collection of files
6. Integrate your Agent with external tools (in this case, PagerDuty)
Let's dive right in.
Set up a Chainlit application
Before we go delving into the endless rabbit hole of building AI, we’re going to set ourselves up for success by setting up Chainlit, a popular framework for building conversational assistant interfaces.
Why Chainlit?
Chainlit provides an opinionated set of building blocks for modeling conversational interactions — like threads, messages, and steps — as well as a ChatGPT-like user interface for interacting with the LLM.
It also offers out-of-the-box integrations with popular chat tools like Slack and Teams, as well as libraries for interfacing with popular tooling like React and FastAPI, so you can build it into a larger application, if you want.
In short: Chainlit is going to eliminate a lot of the scaffolding and grunt work for us so that we can focus on developing our AI assistant and getting feedback from our users, instead of fiddling with UI and configuration.
The Goal
By the end of this lab, you’ll have a working Chainlit application that will simply echo back what you say. We’ll jump into the AI integration in the next article.
Prerequisites
Before we get started, you’ll need to get set up with a few things:
A working Python 3.12+ environment. We recommend using pyenv.
A Python package manager. We’ll be using Poetry, but you can use whatever you’re comfortable with.
Once you’re set up, continue on.
Project Setup
First, set up your project, and add chainlit as a dependency:
mkdir roger
cd roger
poetry init --no-interaction
poetry add chainlit
Chainlit Boilerplate
Next, create an app.py file in the root of your project with the following content:
import chainlit as cl


@cl.on_message
async def handle_message(message: cl.Message) -> None:
    # Echo the message back to the user.
    await cl.Message(
        content=f"Received: {message.content}",
    ).send()
The code above is registering the handle_message function with Chainlit, so that any time a message is received, this function will run.
For the moment, our function simply echoes the message back to the user, prefixed with “Received: ”.
Try it out
Finally, spin it up! You can use --watch to hot-reload your code when you make changes.
poetry run chainlit run app.py --watchRunning this command will start your Chainlit app and open your browser to its UI, where you can send a message and get a response back:

Make your application smarter by connecting an LLM
With our Chainlit app scaffolded, we can connect it to an LLM so that we can talk to it and get a human-like response.
We’ll use OpenAI’s hosted gpt-4o model for simplicity, but using another provider is just a matter of syntax.
The Goal
By the end of this article, you’ll be able to prompt the gpt-4o model and get a response, similar to how you’d interact with ChatGPT. We’ll also make sure that the bot maintains conversation context so that you can ask follow-up questions.
Prerequisites
Before you get started, you’ll need:
An OpenAI account and an API key
Configure an OpenAI API client
First, we’ll configure an API client to interface with OpenAI’s APIs. Add the following code to the top of your app.py:
import os
from openai import AsyncOpenAI

##
# Settings
#
try:
    OPENAI_API_KEY = os.environ["OPENAI_API_KEY"]
except KeyError as ex:
    raise LookupError(f"Missing required environment variable: {ex}")


client = AsyncOpenAI(api_key=OPENAI_API_KEY)

# ...
Send Messages to the LLM
Next, we’ll need to update our handle_message function to send the user’s message to OpenAI and get a response instead of just echoing it back. Replace your handle_message function with this one:
# ...

@cl.on_message
async def handle_message(message: cl.Message) -> None:
    # Retrieve the response from the LLM
    response = await client.chat.completions.create(
        messages=[{"content": message.content, "role": "user"}],
        model="gpt-4o",
    )

    await cl.Message(content=response.choices[0].message.content).send()
Try it out
Now, if you run your application (or if you left it running with the --watch flag), you’ll be able to ask a question and get a response.
Curing Amnesia
If you’ve played around a bit and asked follow-up questions, you may have noticed that the bot doesn’t “remember” anything you’ve talked about. For example:
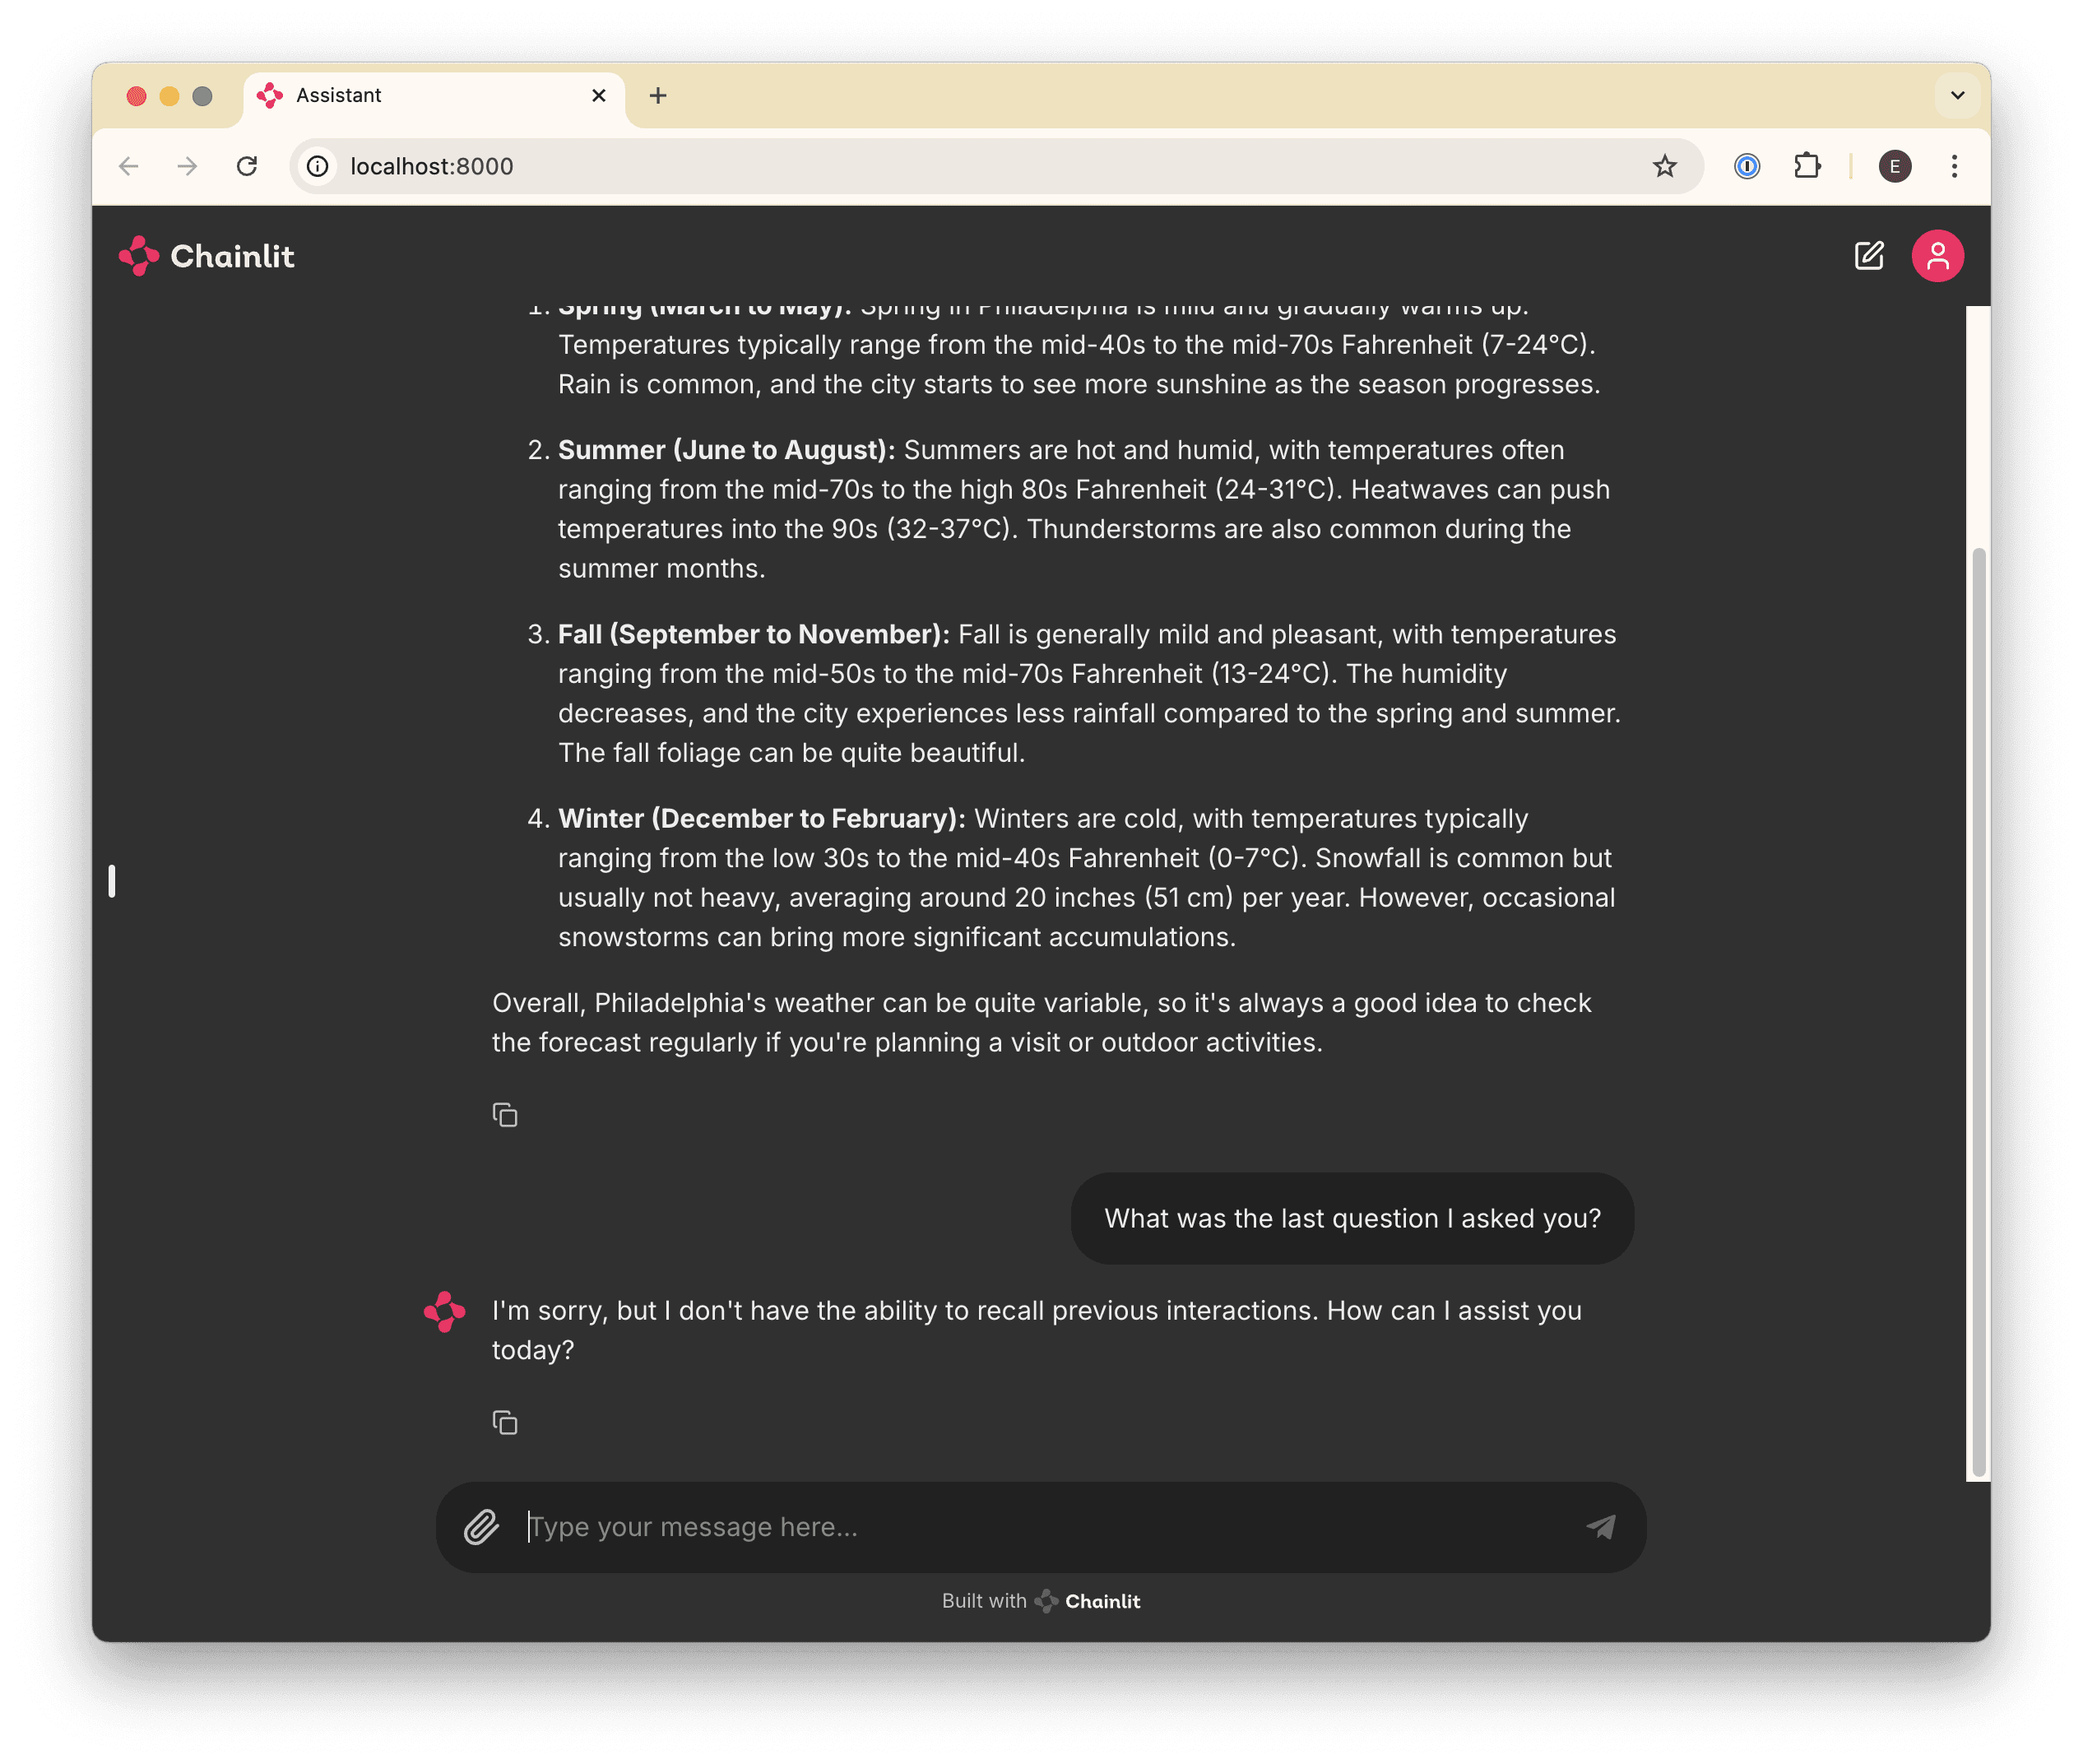
This is happening because every time we send a message, we’re sending only that one message to the LLM, which has no notion of the “conversation” by default.
To cure this amnesia, we’ll need to send all of the messages in the conversation every time we send a new one.
Chainlit makes this easy for us by providing a cl.chat_context.to_openai() helper, which gives us all of the messages exchanged so far, conveniently in the format that OpenAI (and most other providers) expects.
Update your handle_message function to prepend historical messages before the latest one:
# ...

@cl.on_message
async def handle_message(message: cl.Message) -> None:
    # Retrieve the response from the LLM
    response = await client.chat.completions.create(
        messages=[
            # Prepend all previous messages to maintain the conversation.
            *cl.chat_context.to_openai(),
                {"content": message.content, "role": "user"}
            ],
        model="gpt-4o",
    )

    await cl.Message(content=response.choices[0].message.content).send()
Now we can ask follow-up questions!
Faster feedback 🏎️
After completing the first few steps, you may have noticed that when you ask questions that require a long response, there’s a delay before you see anything. This can make for a poor user experience (especially later in step 6, when we start adding long-running tool calls) so let’s fix that.
The Goal
At the end of this step, you’ll be able to see your bot “type” in real-time, similar to ChatGPT.
Stream it
To get real-time message updates, we need to update our implementation to use a “stream”. Basically, whenever we receive a message, we’ll respond immediately with an empty message, start a stream with the LLM, and update our empty message every time we receive a new chunk of the response from the stream.
This might sound complicated, but it’s surprisingly easy! Update your handle_message function as follows:
# ...
@cl.on_message
async def handle_message(message: cl.Message) -> None:
    # Send an empty initial message that we can update with a streaming
    # response.
    message = cl.Message(content="")
    await message.send()

    # Stream the response from the LLM
    stream = await client.chat.completions.create(
        messages=[
            # Prepend all previous messages to maintain the conversation.
            *cl.chat_context.to_openai(),
                {"content": message.content, "role": "user"}
            ],
        model="gpt-4o",
        stream=True,
    )
    # Update the existing (initially-empty) message with new content
    # from each "chunk" in the stream.
    async for chunk in stream:
        if token := chunk.choices[0].delta.content:
            await message.stream_token(token)
    # Send a final update to let the message know it's complete.
await message.update()🧑💻 So, here's the complete code so far:
import os
import chainlit as cl

from openai import AsyncOpenAI

##
# Settings
#
try:
    OPENAI_API_KEY = os.environ["OPENAI_API_KEY"]
except KeyError as ex:
    raise LookupError(f"Missing required environment variable: {ex}")

client = AsyncOpenAI(api_key=OPENAI_API_KEY)


@cl.on_message
async def handle_message(message: cl.Message) -> None:
    # Send an empty initial message that we can update with a streaming
    # response.
    message = cl.Message(content="")
    await message.send()

    # Stream the response from the LLM
    stream = await client.chat.completions.create(
        messages=[
            # Prepend all previous messages to maintain the conversation.
            *cl.chat_context.to_openai(),
                {"content": message.content, "role": "user"}
            ],
        model="gpt-4o",
        stream=True,
    )

    # Update the existing (initially-empty) message with the content
    # from each "chunk" in the stream.
    async for chunk in stream:
        if token := chunk.choices[0].delta.content or "":
            await message.stream_token(token)

    # Send a final update to let the message know it's complete.
    await message.update()
Try it out
Now, when you ask a question, you should see your bot “typing” in real-time!

Give your Agent a specialization and personality 💁♂️
By this point, we’ve built a lightweight clone of ChatGPT. That’s cool and all, but what we really want is an assistant that will help us perform a specific task: in this case, we want it to troubleshoot incidents, like an SRE would.
To get there, we’ll start by refactoring our agent into a custom OpenAI Assistant, which will give us control over the system prompt (as well as the ability to give the LLM access to tools like file search and function calls, which we’ll cover later).
The Goal
By the end of this step, you’ll have refactored your bot into a custom “Assistant” and customize its system prompt to give it its own “personality”. Your code will also use a “thread”, which will persist messages using the OpenAI API, instead of having to send all messages every time we receive a new one.
Create an Assistant & Thread
Creating an Assistant is straightforward: we just need to call the OpenAI Assistants API. However, we only want to do this once when the application starts up, so we can’t put that API call in the handle_message function.
Instead, we’ll use another Chainlit hook — on_chat_start, which will only run once when the application first starts — to set up our assistant.
Add this to your app.py:
# ...

# Give your assistant a name.
OPENAI_ASSISTANT_NAME = "roger"

# Give your assistant some custom instructions.
OPENAI_ASSISTANT_INSTRUCTIONS = """
You are an expert Site Reliability Engineer, tasked with helping
the SRE team respond to and resolve incidents.

If you are presented with a question that does not seem like it
could be related to infrastructure, begin your response with a polite
reminder that your primary responsibilities are to help with incident
response, before fully answering the question to the best of your ability.
"""


@cl.on_chat_start
async def handle_chat_start() -> str:
        assistant = None

        # Try to find an existing assistant so we don't create duplicates.
        async for existing_assistant in await client.beta.assistants.list():
              if existing_assistant.name == OPENAI_ASSISTANT_NAME:
                  assistant = existing_assistant
                  break

        # Create an assistant if we didn't find an existing one.
    assistant = assistant or await client.beta.assistants.create(
        name=OPENAI_ASSISTANT_NAME,
        model="gpt-4o",
    )

    # Update the assistant so that it always has the latest instructions
    assistant = await client.beta.assistants.update(
            assistant_id=assistant.id,
        instructions=OPENAI_ASSISTANT_INSTRUCTIONS,
    )

    # Create a thread for the conversation
    thread = await client.beta.threads.create()

    # Add the assistant and the new thread to the user session so that
    # we can reference it in other handlers.
    cl.user_session.set("assistant", assistant)
    cl.user_session.set("thread", thread)

# ...
Note: it’s technically possible to give the assistant a custom system prompt by providing an initial system-type message in the message history in handle_message. However, we’re refactoring into an assistant with custom instructions because it unlocks several other capabilities that we’ll use in the near future.
Refactor Message Handling to use the Assistant
Now that we have an Assistant and a Thread for the conversation, we can refactor our message handler to use them.
First, we need an AssistantEventHandler to tell our new Assistant object how to handle the various events that occur during a conversation.
Add the following to your app.py:
from typing import override
from openai import AsyncAssistantEventHandler
from openai.types.beta.threads import Message, TextDelta, Text

# ...

class MessageEventHandler(AsyncAssistantEventHandler):
    """An event handler for updating a Chainlit message while streaming an OpenAI response."""

    message: cl.Message

    @override
    async def on_text_created(self, text: Text) -> None:
        """Create a new message so that we can update it."""
        self.message = cl.Message(content="")
        await self.message.send()

    @override
    async def on_text_delta(self, delta: TextDelta, snapshot: Text) -> None:
        """Update the message with the latest text delta streamed to us."""
        await self.message.stream_token(delta.value)

    @override
    async def on_message_done(self, message: Message) -> None:
        """Update the message with the final text when the stream completes."""
        await self.message.update()
Now, we just need to adjust our handle_message function to use all of our new toys! Update your handle_message function to the following:
# ...

@cl.on_message
async def handle_message(message: cl.Message) -> None:
        # Retrieve our Assistant and Thread from our user session.
    assistant = cl.user_session.get("assistant")
    thread = cl.user_session.get("thread")

    # Add the latest message to the thread.
    await client.beta.threads.messages.create(
        thread_id=thread.id,
        role="user",
        content=message.content,
    )

        # Stream a response to the Thread (called a "Run") using our Assistant.
    async with client.beta.threads.runs.stream(
        assistant_id=assistant.id,
        thread_id=thread.id,
        # Use our custom message handler.
        event_handler=MessageEventHandler(),
    ) as stream:
await stream.until_done()🧑💻 Now here's the complete code so far:
import os
from typing import override
import chainlit as cl

from openai import AsyncOpenAI, AsyncAssistantEventHandler
from openai.types.beta.threads import Message, TextDelta, Text


##
# Settings
#
try:
    OPENAI_API_KEY = os.environ["OPENAI_API_KEY"]
except KeyError as ex:
    raise LookupError(f"Missing required environment variable: {ex}")

# Give your assistant a name.
OPENAI_ASSISTANT_NAME = "roger"

# Give your assistant some custom instructions.
OPENAI_ASSISTANT_INSTRUCTIONS = """
You are an expert Site Reliability Engineer, tasked with helping
the SRE team respond to and resolve incidents.

If you are presented with a question that does not seem like it
could be related to infrastructure, begin your response with a polite
reminder that your primary responsibilities are to help with incident
response, before fully answering the question to the best of your ability.
"""


client = AsyncOpenAI(api_key=OPENAI_API_KEY)


class MessageEventHandler(AsyncAssistantEventHandler):
    """An event handler for updating a Chainlit message while streaming an OpenAI response."""

    message: cl.Message

    @override
    async def on_text_created(self, text: Text) -> None:
        """Create a new message so that we can update it."""
        self.message = cl.Message(content="")
        await self.message.send()

    @override
    async def on_text_delta(self, delta: TextDelta, snapshot: Text) -> None:
        """Update the message with the latest text delta streamed to us."""
        await self.message.stream_token(delta.value)

    @override
    async def on_message_done(self, message: Message) -> None:
        """Update the message with the final text when the stream completes."""
        await self.message.update()


@cl.on_chat_start
async def handle_chat_start() -> str:
    assistant = None

    # Try to find an existing assistant so we don't create duplicates.
    async for existing_assistant in await client.beta.assistants.list():
        if existing_assistant.name == OPENAI_ASSISTANT_NAME:
            assistant = existing_assistant
            break

    # Create an assistant if we didn't find an existing one.
    assistant = assistant or await client.beta.assistants.create(
        name=OPENAI_ASSISTANT_NAME,
        model="gpt-4o",
    )

    # Update the assistant so that it always has the latest instructions
    assistant = await client.beta.assistants.update(
        assistant_id=assistant.id,
        instructions=OPENAI_ASSISTANT_INSTRUCTIONS,
    )

    # Create a thread for the conversation
    thread = await client.beta.threads.create()

    # Add the assistant and the new thread to the user session so that
    # we can reference it in other handlers.
    cl.user_session.set("assistant", assistant)
    cl.user_session.set("thread", thread)


@cl.on_message
async def handle_message(message: cl.Message) -> None:
    # Retrieve our Assistant and Thread from our user session.
    assistant = cl.user_session.get("assistant")
    thread = cl.user_session.get("thread")

    # Add the latest message to the thread.
    await client.beta.threads.messages.create(
        thread_id=thread.id,
        role="user",
        content=message.content,
    )

    # Stream a response to the Thread (called a "Run") using our Assistant.
    async with client.beta.threads.runs.stream(
        assistant_id=assistant.id,
        thread_id=thread.id,
        # Use our custom message handler.
        event_handler=MessageEventHandler(),
    ) as stream:
        await stream.until_done()
Get started with your AI SRE Agent
In this guide, we'll be covering:
Some background: why so many companies (including Aptible) are investing in building an AI Agent to supplement incident response
Some philosophical considerations: decisions we made with Aptible AI, what we’ve built so far, and a few pro tips
A complete step-by-step guide on how to build your own AI Agent, including:
How to set up an application in Chainlit
How to connect your application to an LLM (in this case, gpt-4o)
How to make your Agent faster and add real-time “typing” (similar to ChatGPT)
How to give your Agent a personality and specialization
How to give your Agent the ability to search a collection of files
How to integrate your Agent with external tools (in this case, PagerDuty)
🚨 Coming soon: open source infra knowledge graph 🚨
In the next few weeks, we’re dropping an open source AI-powered infrastructure knowledge graph that will allow you to build even more effective AI agents with access to a real-time map of your cloud infra. Here's how it works:
Pre-fetches data from cloud APIs across services like AWS, Kubernetes, Datadog, etc. so that you’re not making hundreds or thousands of API calls any time you need data.
Models cloud resources, their state, and historical changes as a connected graph, providing the context you need to answer the real questions.
Exposes an MCP server that allows you to build agents on top of real context rather than raw, disparate APIs.
And you’ll be able to install it using homebrew with one line of code.
Why use an AI Agent for incident response?
Incident response is messy. Knowledge silos end up forcing you to rely on a handful of subject matter experts and tenured engineers; SREs waste time on manual investigations during incidents at the expense of high impact work; and all of this leads to more downtime, higher MTTR, and potentially lost revenue. Aptible isn’t the first team to feel those pains, and we won’t be the last. But we’ve found a better way by implementing an AI Agent to act as an assistant to our SREs. Here’s why:
AI is really good at mundane, time consuming tasks like quickly retrieving information from disparate sources, summarizing huge amounts of data, and pattern matching. These benefits — when combined with human instinct, logic, and decision making skills — make AI ripe for augmenting on-call engineering teams during incidents.
At Aptible, we saw the potential here for our own incident response processes and decided to build an AI SRE Agent to help lower MTTR, eliminate knowledge silos, and decrease reliance on our most senior engineers.
We’ve spoken to quite a few engineering leads who are building the same type of tool for their teams, and we can all agree that building any kind of nontrivial AI assistant is hard for several reasons:
Given that AI is still so new, there are few established standards or best practices
Frameworks are changing all the time
So much information online is already outdated (or will be soon)
Because the demand for an AI Agent that actually works is so high — and since we’ve put so much time into building our own already — we’re going to share a detailed explanation of what we’ve built so far, the main considerations we had to take into account, and suggestions on how you can do it yourself.
What we’ve built so far + decisions we’ve made along the way
Is there already a tool for that?
🤔 Considerations: If you don’t need to build something new, then you shouldn’t. There are so. many. tools on the market. And depending on your specific use case, you may be able to find one that works for you.
The impetus for Aptible’s search and eventual development of our own incident response was that we struggled with knowledge silos and had a tendency to rely on three or four subject matter experts any time we encountered an issue with a particular system.
So we started with an open source tool called Danswer to improve information retrieval (similar to its popular commercial competitor, Glean). It plugged directly into Slack and could retrieve answers to natural language questions from various information sources. The problem was that it was limited to indexed data only (i.e., just our docs and our chat history).
⚒️ What we built: What we needed was a tool that could integrate with all our other systems (not just docs and Slack). We needed to retrieve logs and metrics, application health status, and generate reports and postmortems after our incidents were over. So we designed an AI Agent that’s essentially built on a series of integrations that allow you to connect with both real-time and indexed data. More on that later!
💡 Pro tip:
Before you decide to build your own product, look into what’s already available. A great place to start might be crowdsourcing ideas from Reddit (check out this thread, for one) or checking out some of the open source tools out there (here’s a good place to start in github if you’re looking for incident response tools specifically). There’s also a long list of open source AI Agents that you could start using tomorrow.
What’s your integration strategy?
🤔 Considerations: As mentioned above, the biggest consideration here is: what sort of information do you need your Agent to have access to? You could maybe get away with simply integrating it with third-party providers via an API, but if you need the integration to be more specific to your needs then you’ll need to be more thoughtful with how your integrations work.
By carefully considering what you’ll need to integrate with before you start building, you’ll save yourself some headache later on. Do you need your Agent to be able to execute custom scripts to query your databases? Do you need real-time retrieval of logs and metrics, and how will you design the Agent to retrieve that information? Will it return the link to the source? Will it return a chunk of lines of logs that you still have to manually sift through, or will it be able to deduce where the anomaly may be?
⚒️ What we built: At its core, Aptible AI is built on a series of integrations. An integration is more than just a connection to a third-party provider, it’s also a collection of configurations that are unique to how our team uses that provider. For example, Aptible AI supports multiple integrations for the same provider since we may want to use that provider in different ways. Different teams use Datadog differently and care about different metrics or use different tags, so each team can use the integration to the same tool in the way that they need.
Aptible AI supports a range of common SRE tooling, including:
Chat and other highly synchronous communications
Documentation and other knowledge repositories
Observability
Alerting
The actual implementation of these integrations fits into one of three categories of customizability:
For starters, you have a basic integration that requires no customization (PagerDuty is one example). Since it’s just pulling data from PagerDuty and adding it to the AI’s context, every single team that leverages the PagerDuty integration uses it in the same way.
Next, we have more customizable integrations (like the Datadog example from before) that are built on top of a generic InfluxDB integration but customized to the specific use cases of looking up container metrics and looking up restart activity.
Finally, there are fully custom tools that would likely make no sense to anyone outside of Aptible (an example here would be our integration that gets containers for an application). These are entirely specific to how we run our infrastructure and can be implemented either by a lightweight PubSub interface or a websocket-based “safe” proxy.
💡 Pro tip:
Less is more! If you give the model too many tools to choose from, it can start choosing incorrect tools and confuse itself. More on that in the next section
Speed vs. quality — what’s the right balance?
🤔 Considerations: So, first of all, no one wants an AI Agent that takes ages to respond. It defeats the whole purpose of building an Agent in the first place if you could do it faster yourself. There are two things to consider here: first of all (and we’ll get into this more in the next section), tweaking your prompt to ask the agent to be more brief will help to speed up your Agent a bit; secondly, you could consider using a faster model like 4o-mini, but you may be sacrificing a bit on the capabilities side (which might be fine, depending on your use case).
It’s also important to keep in mind that you must show the user that the bot has gotten the request and is working on a response (otherwise, they may get frustrated or confused and stop engaging). In the step-by-step lab below, we’ll show you how to enable real-time typing to indicate to the user that the Agent is about to respond (similar to ChatGPT, as you likely know). However, because we originally built Aptible AI as a Slack integration, we’ve been limited on how we can show that the Agent has seen the request and is working on gathering a response.
⚒️ What we built: We’ve spend a lot of time tweaking the prompts for Aptible AI (again, more on that in the next section) to ensure that it can respond quickly and effectively. As for the Slack integration, since we can’t show live typing, we tell the Agent to react to any question that it will react with a 👀 to indicate that the Agent has seen your request and is working on a response. We made sure to send that reaction as fast as possible to give our users confidence that we’re handling their request.
💡 Pro tip:
The model that you choose will impact speed; it’s important to strike the proper balance between speed and capability. Here is a detailed breakdown of the quality, speed, and price of leading LLM models to get you started.
So many models, how do you pick one?!
🤔 Considerations: Here’s the thing with models… new ones pop up every day, and there are several considerations to keep in mind when choosing one (mainly to do with your specific use cases). Should you self-host? Do you need your Agent to be conversational or task-based or both? Will it be conducting simple or complex tasks? Do you need real-time performance?
There’s no need for us to go through all the models that exist since that content is already all over the place (if you want a deep dive, this is a great resource), but we can walk through the decisions that we had to make when building Aptible AI and the options we considered.
It’s a tricky process because you can’t really avoid tradeoffs. If you need your Agent to conduct complex tasks, then you’ll have to sacrifice a bit on speed and cost.
The model’s size, capability, and architecture depend heavily on whether the tasks require simple classification or highly complex reasoning and interaction. If simple, a smaller, lightweight model like a decision tree, random forest, or simple neural network would suffice. If more complex, then you may consider a more powerful model like GPT-4, BERT, or a similar transformer-based architecture.
If you choose to self-host to avoid the security headache, you’ll likely have to sacrifice on features and functionality since your self-hosted version will lag behind the hosted options.
If you need your Agent to be trained on domain-specific knowledge, then you’ll need to curate or create your own datasets for fine-tuning. See if you can get away with using a pre-trained model that’s already been trained on large datasets to avoid the data quality issue (though this may be impossible depending on the data you need your Agent to have access to).
⚒️ What we built: We’re currently using GPT-4o for Aptible AI because we believe that it’s most likely to give us the highest quality answers. However, we recognize that customers using Aptible AI may want to use their own models (including self-hosted models). As such, we’re keeping that in mind as we build.
💡 Pro tip:
Your Agent will only be as smart as the information that you give it. LLMs need help understanding how and when to use the information you give it, and if you don’t give it instructions on how to interpret information, it’ll just make something up. Spend real effort upfront curating the information you feed to your LLM!
What about prompting techniques?
🤔 Considerations: You might be tempted to retrieve as much data as possible (documentation, Slack conversations, code repositories, issue trackers, etc.), throw it all at a RAG application**,** and ask it questions. But in our experience, there’s almost always going to be too much noise for this to be useful. That’s where prompt engineering comes in.
We’ve alluded to this already, but prompt engineering is a critical piece of the puzzle here (for a great overview on prompting techniques, check this out). The better your prompt engineering, the better your Agent will be.
For context, here are a few that we considered (over time) when building Aptible AI:
Zero-shot prompting: this is what most people do when they talk to ChatGPT; they just ask it a question then they get a response. If the response is bad, then they just ask the question differently.
Few-shot prompting: this is what slightly-more-experienced people do when talking to ChatGPT; they ask it a question and include examples of the output they want. You might use zero- and/or few-shot prompting for very simple tasks that the underlying model already knows how to do.
Retrieval Augmented Generation (RAG): this is a technique that allows the model to retrieve additional context and use it to answer the question. This is particularly useful for AI-powered document search (see also: Glean and Danswer).
ReAct: this technique allows an agent to generate “thoughts” and take “actions” in an iterative way to solve a problem, most similar to human reasoning. ReAct is great for moderately complex problems, like navigating references through documentation and tools in real time to compose an answer.
An important thing to keep in mind is that you can mix and match with these techniques (we’ll cover the multi-agent approach next). Here’s what we did…
⚒️ What we built: Because Aptible AI has a multi-agent structure (more on that later), we’ve implemented a mix of ReAct and RAG depending on the complexity of the task/question.
So when you ask the AI a question, we hand off all of the integrations (with instructions on how to use them) to the AI. The AI then makes decisions about what tools to call based on the information it has available to it. After each integration call, the AI has the option of deciding it has enough information to provide an answer, or deciding that additional integrations are relevant and could potentially yield additional information.
Throughout the process, we’re trying to help the AI make better decisions about what integrations to leverage via a few different mechanisms:
Extensive prompt engineering for the integrations, to make sure it’s really clear when and how to use each integration, as well as how to interpret the output.
We’ve built a self-rating system that asks the AI to self-rate the value of the response from an integration. Even when the AI makes a dumb decision in calling a integration (or provides bad inputs), it’s typically able to recognize that after the fact if you ask it to self-rate whether or not the output of the integration was useful. We can then use that to influence how much a specific output factors into a response. We can also block the AI from proceeding if it’s consistently making bad decisions.
We’ve implemented Naïve Bayes based on past experience. For example, if most of the time you call integration A and then B, and that yields useful results, it’s probably useful to continue doing so. The Agent can also use things like comparing to previous similar incidents to further narrow what integrations are useful, and when, in specific scenarios.
💡 Pro tip:
To avoid nonsense answers that sound correct but aren’t, be sure to take a step back and consider where your most useful information typically comes from for the problems that you’re trying to solve with AI – then design your Agent based on that.
Multi-agent or single agent?
🤔 Considerations: Multi-agent approaches are becoming more popular, but they can be complicated and potentially unnecessary depending on your use case. It can be quite useful to have a team of agents working together with different techniques to solve complex problems.
For example, if you ask your bot a question in Slack that has nothing to do with your specific infrastructure (maybe you just want to know who won the World Series in 1995), you could have an Agent built on zero-shot prompting to simply act as a ChatGPT that’s integrated with your Slack (or wherever you have it).
But if your question or need is complex, it would be useful to have a team of Agents that basically act as your little research team, gathering and analyzing data from disparate sources in an intelligent way.
⚒️ What we built: Aptible AI uses a multi-agent approach, starting with a broker Agent that determines what type of question or task needs to be addressed.
💡 Pro tip: It’s easier to refactor into a multi-agent approach than out of it! So make sure you need it before you start building your Agent that way.
What do you want your bot to specialize in?
🤔 Considerations: In the same vein as making your agent fast, you also have to consider exactly how you want to customize it. This not only means determining how much information it needs to have access to (which will affect speed and quality), but it also means giving it a personality if you’d like 😄
Just like a human, your Agent has to specialize in the problem(s) you're trying to solve in order to be most useful and avoid spewing incorrect or misleading information. This means adjusting the system prompt. What you need to consider here is: how strict do you want your system prompt? Do you want your Agent to try to answer as many questions as possible? Or would you prefer that it outright denies any questions that it won’t be certain about? You could even design it to express uncertainty so that it doesn’t sound too authoritative and lead to confusion or distrust among your engineering teams.
⚒️ What we built: Our system prompt is very strict — Aptible AI outright refuses to answer questions that aren't related to incidents in order to mitigate the possibility for wrong answers or hallucinations.
💡 Pro tip:
If your implementation is sophisticated enough, you could consider customizing your Agent’s behavior based on who it’s talking to (i.e., you can ask it to be more socratic and verbose for junior team members to help them learn, or to be more terse and to-the-point for senior engineers, etc).
Ok, let’s jump in! Below, you’ll add speed and personality to your Agent, giving it the ability to type in real-time and testing out a few system prompts to show how your prompt engineering affects how the Agent responds.
What information should my Agent have access to?
🤔 Considerations: Before you start feeding your LLM all of the information you can possibly find, think strategically about what exactly you want the Agent to be able to do and what its purpose is. Later on in the guide, we’ll show you how to give your bot the ability to search a collection of files effectively. Just keep in mind that the more information you give it, the trickier it can become to maintain high levels of accuracy.
🛠️ What we built: Aptible AI was built for the very specific purpose of helping our SRE team and on-call engineers to debug and resolve production issues faster. So we’ve given it access to our runbooks and other documentation and we’ve designed it to gather and surface as much relevant information about the incident as it can. It then returns the data to Slack in a dynamic dashboard for our engineers to then investigate.
We’ve found that by simply surfacing the information quickly, the Agent provides instant and consistent value versus trying to answer every single question (thereby increasing the likelihood of AI hallucination).
💡 Pro tip:
Resist the temptation to just plug the LLM into your existing search infrastructure! It may seem simpler, but LLMs perform better if you allow them to search semantically (i.e. using vectors) instead of trying to come up with keywords it thinks might be relevant.
Can’t forget about security…
🤔 Considerations: Here’s a topic that comes up a lot when we chat with Aptible AI early users. Most engineering teams eventually have to face their security team when it comes to implementing new tools, and it’s critical to ensure that the data is safe (especially if you’re working in a highly regulated industry). So the first thing you have to do is to know your organization’s AI security policy, then there are a few things you can do to protect against potential data leaks or external threats.
⚒️ What we built: For starters, we use a model that doesn’t train on our data. We're still doing a lot of discovery around what customers need regarding security, whether that's self-hosting or something else! Stay tuned.
💡 Pro tip:
Be careful with the data you give your AI access to or include in prompts, especially if that data shouldn’t be shared with the end user! If you need to include unpredictable data like logs, consider using at tool like Nightfall to ensure what’s passed to the LLM and end users is sanitized
Oh, and of course, it needs to be usable!
🤔 Considerations: How do you plan to use your Agent? Does it need to have a UI? Will it be used across the organization?
You likely don’t need to spend time reinventing the wheel when it comes to the UX around your bot. Frameworks like Chainlit, Gradio, and Streamlit give you out-of-the-box tools for building user interfaces and/or integrating with your other workflow tools like Slack. Use one of these tools to start so that you can focus on getting good answers out of your Agent!
⚒️ What we built: Because our Agent was built specifically for incident response — and because we handle incidents within Slack — we mainly use Slack as our UI. It has its limitations, though, so we do our best to work around them (i.e. instead of showing that the Agent is responding by mimicking typing as seen in ChatGPT, the bot instead react to the question in Slack with an 👀 emoji). We also designed a web UI for configuration, reporting, auditing, and analytics.
💡 Pro tip:
Be sure to keep your LLM code as decoupled as you can, so that you can easily refactor away into another UX if the need arises.
Okay, let’s move on from the theoretical talk about models, techniques, and frameworks! Time to get your hands dirty and start building your own Agent.
Hands-on lab: A step-by-step guide on how to build your own Agent for SRE Teams
In the following lab, we'll show you how to:
1. Set up an Agent in Chainlit
2. Connect your Agent to an LLM (in this case, gpt-4o)
3. Make your Agent faster and add real-time “typing” (similar to ChatGPT)
4. Give your Agent a personality and specialization
5. Give your Agent the ability to search a collection of files
6. Integrate your Agent with external tools (in this case, PagerDuty)
Let's dive right in.
Set up a Chainlit application
Before we go delving into the endless rabbit hole of building AI, we’re going to set ourselves up for success by setting up Chainlit, a popular framework for building conversational assistant interfaces.
Why Chainlit?
Chainlit provides an opinionated set of building blocks for modeling conversational interactions — like threads, messages, and steps — as well as a ChatGPT-like user interface for interacting with the LLM.
It also offers out-of-the-box integrations with popular chat tools like Slack and Teams, as well as libraries for interfacing with popular tooling like React and FastAPI, so you can build it into a larger application, if you want.
In short: Chainlit is going to eliminate a lot of the scaffolding and grunt work for us so that we can focus on developing our AI assistant and getting feedback from our users, instead of fiddling with UI and configuration.
The Goal
By the end of this lab, you’ll have a working Chainlit application that will simply echo back what you say. We’ll jump into the AI integration in the next article.
Prerequisites
Before we get started, you’ll need to get set up with a few things:
A working Python 3.12+ environment. We recommend using pyenv.
A Python package manager. We’ll be using Poetry, but you can use whatever you’re comfortable with.
Once you’re set up, continue on.
Project Setup
First, set up your project, and add chainlit as a dependency:
mkdir roger
cd roger
poetry init --no-interaction
poetry add chainlit
Chainlit Boilerplate
Next, create an app.py file in the root of your project with the following content:
import chainlit as cl


@cl.on_message
async def handle_message(message: cl.Message) -> None:
    # Echo the message back to the user.
    await cl.Message(
        content=f"Received: {message.content}",
    ).send()
The code above is registering the handle_message function with Chainlit, so that any time a message is received, this function will run.
For the moment, our function simply echoes the message back to the user, prefixed with “Received: ”.
Try it out
Finally, spin it up! You can use --watch to hot-reload your code when you make changes.
poetry run chainlit run app.py --watchRunning this command will start your Chainlit app and open your browser to its UI, where you can send a message and get a response back:
Make your application smarter by connecting an LLM
With our Chainlit app scaffolded, we can connect it to an LLM so that we can talk to it and get a human-like response.
We’ll use OpenAI’s hosted gpt-4o model for simplicity, but using another provider is just a matter of syntax.
The Goal
By the end of this article, you’ll be able to prompt the gpt-4o model and get a response, similar to how you’d interact with ChatGPT. We’ll also make sure that the bot maintains conversation context so that you can ask follow-up questions.
Prerequisites
Before you get started, you’ll need:
An OpenAI account and an API key
Configure an OpenAI API client
First, we’ll configure an API client to interface with OpenAI’s APIs. Add the following code to the top of your app.py:
import os
from openai import AsyncOpenAI

##
# Settings
#
try:
    OPENAI_API_KEY = os.environ["OPENAI_API_KEY"]
except KeyError as ex:
    raise LookupError(f"Missing required environment variable: {ex}")


client = AsyncOpenAI(api_key=OPENAI_API_KEY)

# ...
Send Messages to the LLM
Next, we’ll need to update our handle_message function to send the user’s message to OpenAI and get a response instead of just echoing it back. Replace your handle_message function with this one:
# ...
@cl.on_message
async def handle_message(message: cl.Message) -> None:
# Retrieve the response from the LLM
response = await client.chat.completions.create(
messages=[{"content": message.content, "role": "user"}],
model="gpt-4o",
)
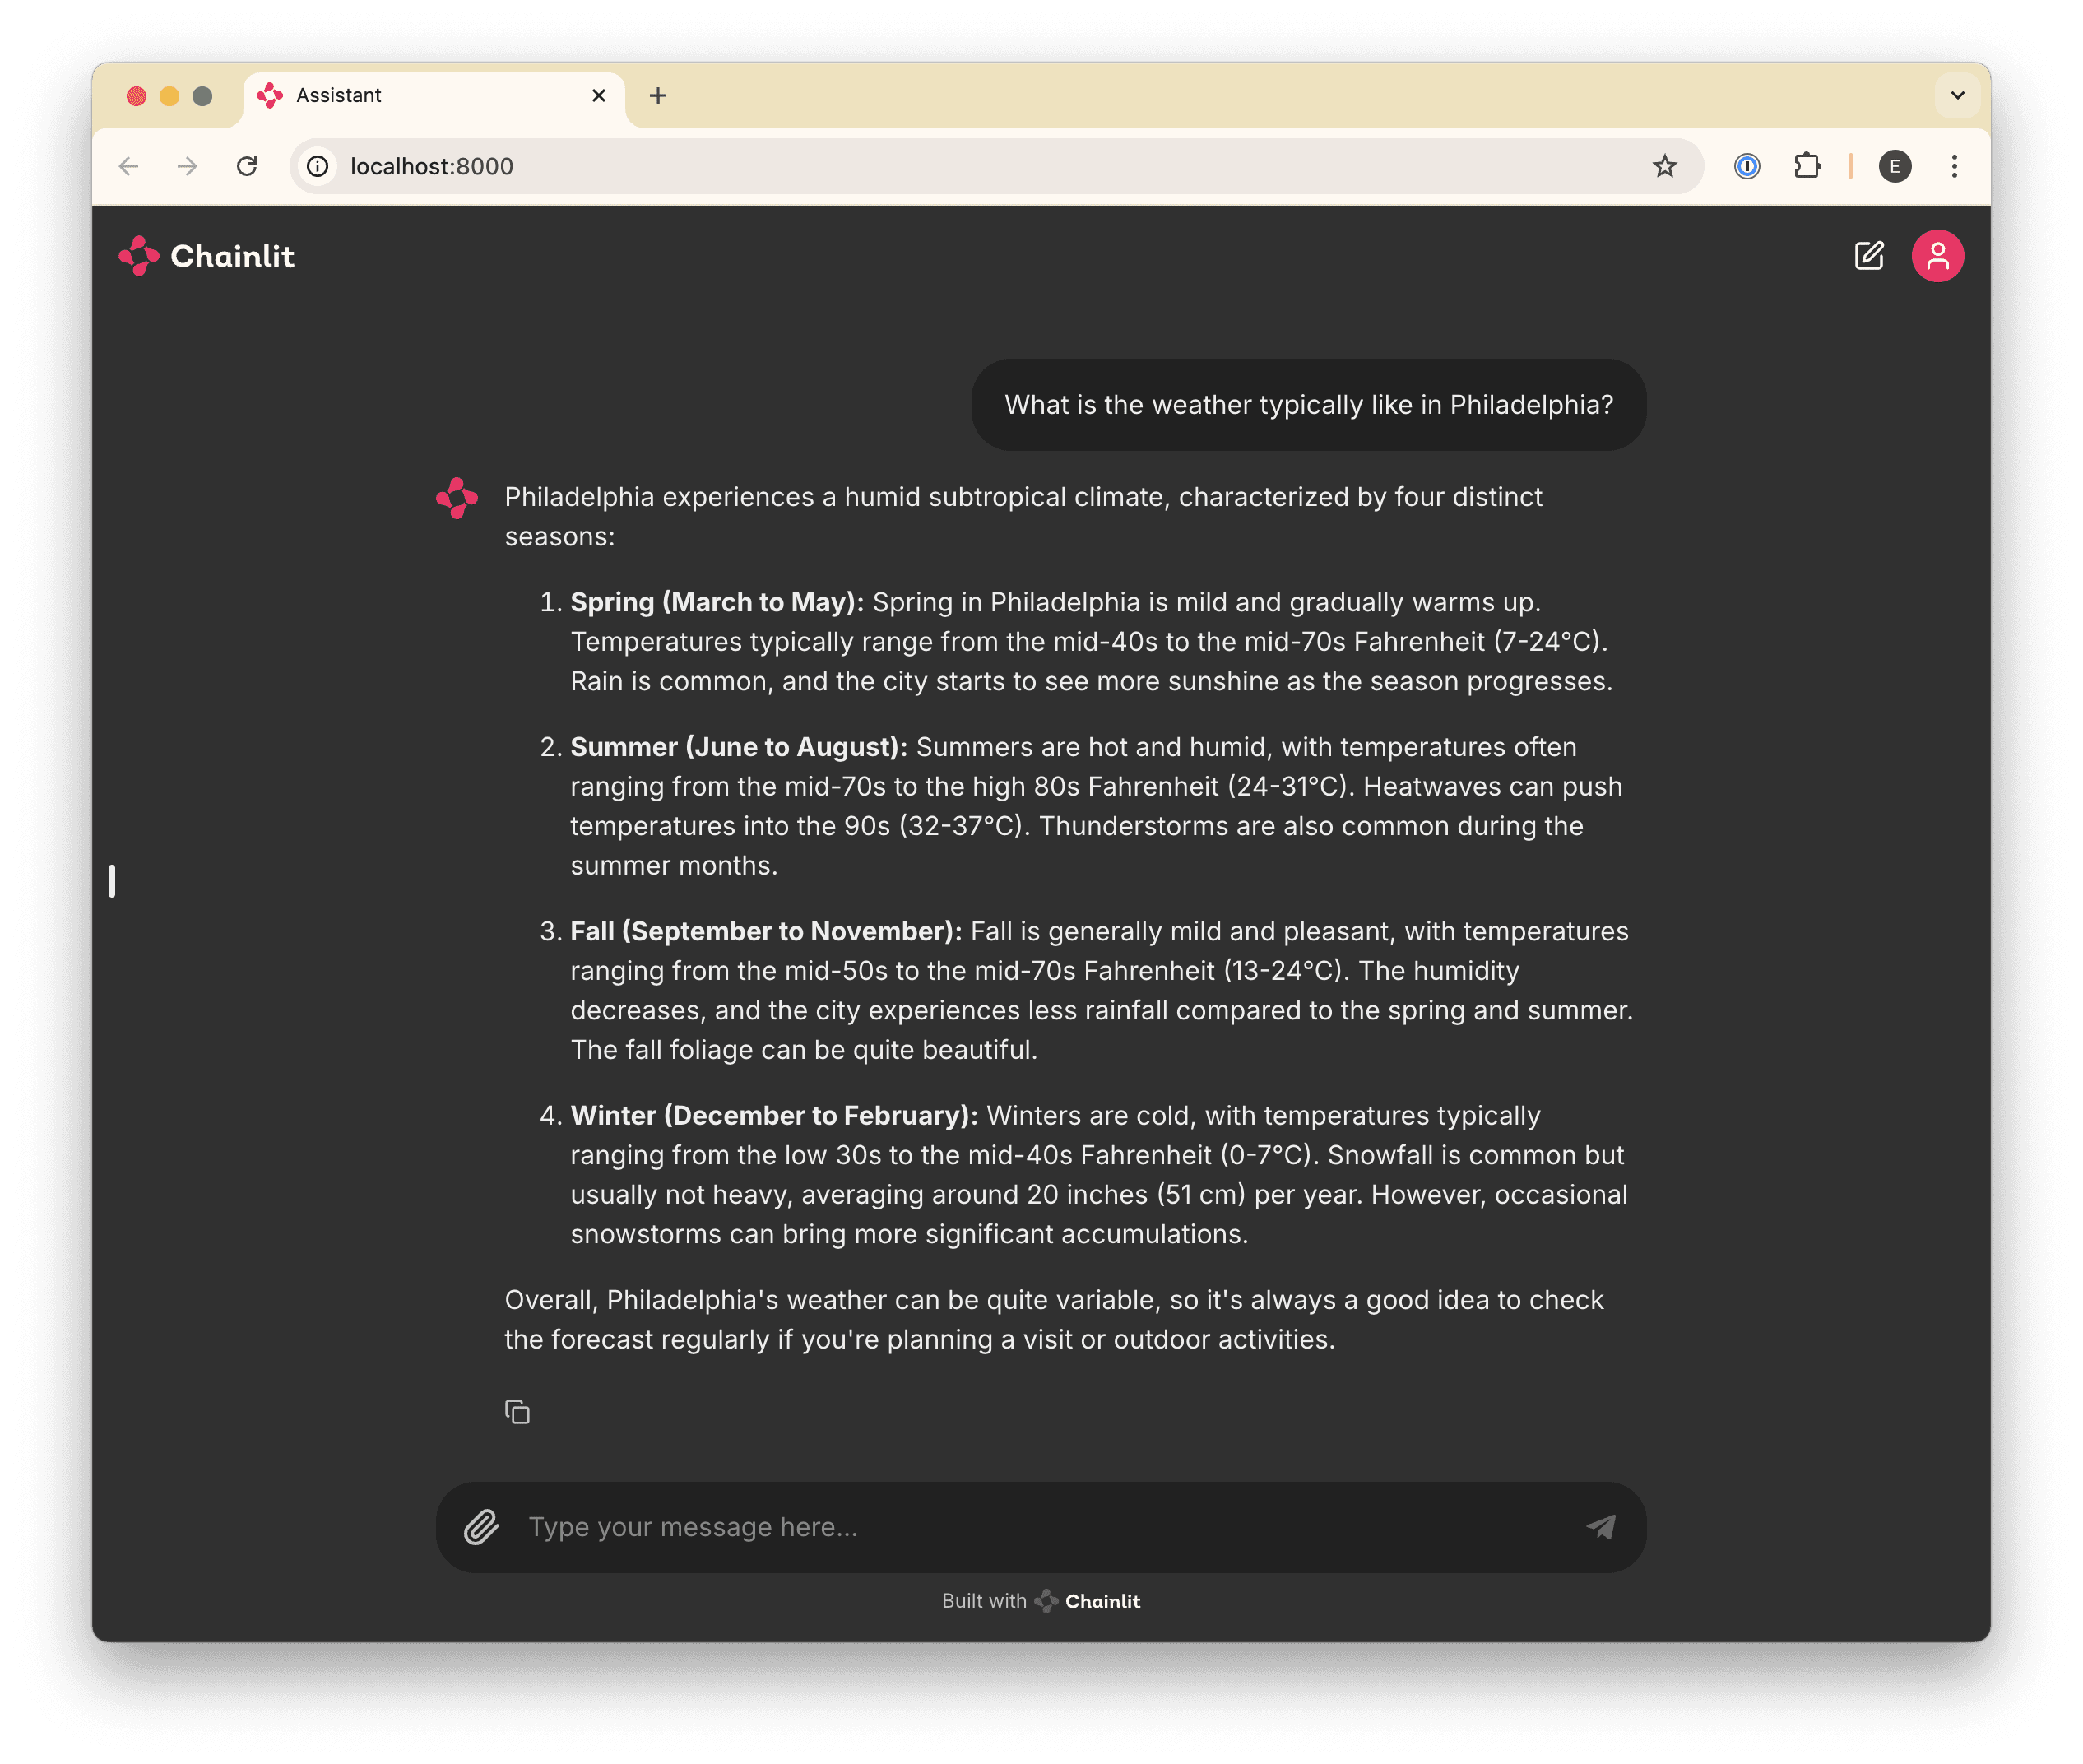
await cl.Message(content=response.choices[0].message.content).send()Try it out
Now, if you run your application (or if you left it running with the --watch flag), you’ll be able to ask a question and get a response.
Curing Amnesia
If you’ve played around a bit and asked follow-up questions, you may have noticed that the bot doesn’t “remember” anything you’ve talked about. For example:
This is happening because every time we send a message, we’re sending only that one message to the LLM, which has no notion of the “conversation” by default.
To cure this amnesia, we’ll need to send all of the messages in the conversation every time we send a new one.
Chainlit makes this easy for us by providing a cl.chat_context.to_openai() helper, which gives us all of the messages exchanged so far, conveniently in the format that OpenAI (and most other providers) expects.
Update your handle_message function to prepend historical messages before the latest one:
# ...

@cl.on_message
async def handle_message(message: cl.Message) -> None:
    # Retrieve the response from the LLM
    response = await client.chat.completions.create(
        messages=[
            # Prepend all previous messages to maintain the conversation.
            *cl.chat_context.to_openai(),
                {"content": message.content, "role": "user"}
            ],
        model="gpt-4o",
    )

    await cl.Message(content=response.choices[0].message.content).send()
Now we can ask follow-up questions!
Faster feedback 🏎️
After completing the first few steps, you may have noticed that when you ask questions that require a long response, there’s a delay before you see anything. This can make for a poor user experience (especially later in step 6, when we start adding long-running tool calls) so let’s fix that.
The Goal
At the end of this step, you’ll be able to see your bot “type” in real-time, similar to ChatGPT.
Stream it
To get real-time message updates, we need to update our implementation to use a “stream”. Basically, whenever we receive a message, we’ll respond immediately with an empty message, start a stream with the LLM, and update our empty message every time we receive a new chunk of the response from the stream.
This might sound complicated, but it’s surprisingly easy! Update your handle_message function as follows:
# ...
@cl.on_message
async def handle_message(message: cl.Message) -> None:
    # Send an empty initial message that we can update with a streaming
    # response.
    message = cl.Message(content="")
    await message.send()

    # Stream the response from the LLM
    stream = await client.chat.completions.create(
        messages=[
            # Prepend all previous messages to maintain the conversation.
            *cl.chat_context.to_openai(),
                {"content": message.content, "role": "user"}
            ],
        model="gpt-4o",
        stream=True,
    )
    # Update the existing (initially-empty) message with new content
    # from each "chunk" in the stream.
    async for chunk in stream:
        if token := chunk.choices[0].delta.content:
            await message.stream_token(token)
    # Send a final update to let the message know it's complete.
await message.update()🧑💻 So, here's the complete code so far:
import os
import chainlit as cl

from openai import AsyncOpenAI

##
# Settings
#
try:
    OPENAI_API_KEY = os.environ["OPENAI_API_KEY"]
except KeyError as ex:
    raise LookupError(f"Missing required environment variable: {ex}")

client = AsyncOpenAI(api_key=OPENAI_API_KEY)


@cl.on_message
async def handle_message(message: cl.Message) -> None:
    # Send an empty initial message that we can update with a streaming
    # response.
    message = cl.Message(content="")
    await message.send()

    # Stream the response from the LLM
    stream = await client.chat.completions.create(
        messages=[
            # Prepend all previous messages to maintain the conversation.
            *cl.chat_context.to_openai(),
                {"content": message.content, "role": "user"}
            ],
        model="gpt-4o",
        stream=True,
    )

    # Update the existing (initially-empty) message with the content
    # from each "chunk" in the stream.
    async for chunk in stream:
        if token := chunk.choices[0].delta.content or "":
            await message.stream_token(token)

    # Send a final update to let the message know it's complete.
    await message.update()
Try it out
Now, when you ask a question, you should see your bot “typing” in real-time!
Give your Agent a specialization and personality 💁♂️
By this point, we’ve built a lightweight clone of ChatGPT. That’s cool and all, but what we really want is an assistant that will help us perform a specific task: in this case, we want it to troubleshoot incidents, like an SRE would.
To get there, we’ll start by refactoring our agent into a custom OpenAI Assistant, which will give us control over the system prompt (as well as the ability to give the LLM access to tools like file search and function calls, which we’ll cover later).
The Goal
By the end of this step, you’ll have refactored your bot into a custom “Assistant” and customize its system prompt to give it its own “personality”. Your code will also use a “thread”, which will persist messages using the OpenAI API, instead of having to send all messages every time we receive a new one.
Create an Assistant & Thread
Creating an Assistant is straightforward: we just need to call the OpenAI Assistants API. However, we only want to do this once when the application starts up, so we can’t put that API call in the handle_message function.
Instead, we’ll use another Chainlit hook — on_chat_start, which will only run once when the application first starts — to set up our assistant.
Add this to your app.py:
# ...

# Give your assistant a name.
OPENAI_ASSISTANT_NAME = "roger"

# Give your assistant some custom instructions.
OPENAI_ASSISTANT_INSTRUCTIONS = """
You are an expert Site Reliability Engineer, tasked with helping
the SRE team respond to and resolve incidents.

If you are presented with a question that does not seem like it
could be related to infrastructure, begin your response with a polite
reminder that your primary responsibilities are to help with incident
response, before fully answering the question to the best of your ability.
"""


@cl.on_chat_start
async def handle_chat_start() -> str:
        assistant = None

        # Try to find an existing assistant so we don't create duplicates.
        async for existing_assistant in await client.beta.assistants.list():
              if existing_assistant.name == OPENAI_ASSISTANT_NAME:
                  assistant = existing_assistant
                  break

        # Create an assistant if we didn't find an existing one.
    assistant = assistant or await client.beta.assistants.create(
        name=OPENAI_ASSISTANT_NAME,
        model="gpt-4o",
    )

    # Update the assistant so that it always has the latest instructions
    assistant = await client.beta.assistants.update(
            assistant_id=assistant.id,
        instructions=OPENAI_ASSISTANT_INSTRUCTIONS,
    )

    # Create a thread for the conversation
    thread = await client.beta.threads.create()

    # Add the assistant and the new thread to the user session so that
    # we can reference it in other handlers.
    cl.user_session.set("assistant", assistant)
    cl.user_session.set("thread", thread)

# ...
Note: it’s technically possible to give the assistant a custom system prompt by providing an initial system-type message in the message history in handle_message. However, we’re refactoring into an assistant with custom instructions because it unlocks several other capabilities that we’ll use in the near future.
Refactor Message Handling to use the Assistant
Now that we have an Assistant and a Thread for the conversation, we can refactor our message handler to use them.
First, we need an AssistantEventHandler to tell our new Assistant object how to handle the various events that occur during a conversation.
Add the following to your app.py:
from typing import override
from openai import AsyncAssistantEventHandler
from openai.types.beta.threads import Message, TextDelta, Text

# ...

class MessageEventHandler(AsyncAssistantEventHandler):
    """An event handler for updating a Chainlit message while streaming an OpenAI response."""

    message: cl.Message

    @override
    async def on_text_created(self, text: Text) -> None:
        """Create a new message so that we can update it."""
        self.message = cl.Message(content="")
        await self.message.send()

    @override
    async def on_text_delta(self, delta: TextDelta, snapshot: Text) -> None:
        """Update the message with the latest text delta streamed to us."""
        await self.message.stream_token(delta.value)

    @override
    async def on_message_done(self, message: Message) -> None:
        """Update the message with the final text when the stream completes."""
        await self.message.update()
Now, we just need to adjust our handle_message function to use all of our new toys! Update your handle_message function to the following:
# ...

@cl.on_message
async def handle_message(message: cl.Message) -> None:
        # Retrieve our Assistant and Thread from our user session.
    assistant = cl.user_session.get("assistant")
    thread = cl.user_session.get("thread")

    # Add the latest message to the thread.
    await client.beta.threads.messages.create(
        thread_id=thread.id,
        role="user",
        content=message.content,
    )

        # Stream a response to the Thread (called a "Run") using our Assistant.
    async with client.beta.threads.runs.stream(
        assistant_id=assistant.id,
        thread_id=thread.id,
        # Use our custom message handler.
        event_handler=MessageEventHandler(),
    ) as stream:
await stream.until_done()🧑💻 Now here's the complete code so far:
import os
from typing import override
import chainlit as cl

from openai import AsyncOpenAI, AsyncAssistantEventHandler
from openai.types.beta.threads import Message, TextDelta, Text


##
# Settings
#
try:
    OPENAI_API_KEY = os.environ["OPENAI_API_KEY"]
except KeyError as ex:
    raise LookupError(f"Missing required environment variable: {ex}")

# Give your assistant a name.
OPENAI_ASSISTANT_NAME = "roger"

# Give your assistant some custom instructions.
OPENAI_ASSISTANT_INSTRUCTIONS = """
You are an expert Site Reliability Engineer, tasked with helping
the SRE team respond to and resolve incidents.

If you are presented with a question that does not seem like it
could be related to infrastructure, begin your response with a polite
reminder that your primary responsibilities are to help with incident
response, before fully answering the question to the best of your ability.
"""


client = AsyncOpenAI(api_key=OPENAI_API_KEY)


class MessageEventHandler(AsyncAssistantEventHandler):
    """An event handler for updating a Chainlit message while streaming an OpenAI response."""

    message: cl.Message

    @override
    async def on_text_created(self, text: Text) -> None:
        """Create a new message so that we can update it."""
        self.message = cl.Message(content="")
        await self.message.send()

    @override
    async def on_text_delta(self, delta: TextDelta, snapshot: Text) -> None:
        """Update the message with the latest text delta streamed to us."""
        await self.message.stream_token(delta.value)

    @override
    async def on_message_done(self, message: Message) -> None:
        """Update the message with the final text when the stream completes."""
        await self.message.update()


@cl.on_chat_start
async def handle_chat_start() -> str:
    assistant = None

    # Try to find an existing assistant so we don't create duplicates.
    async for existing_assistant in await client.beta.assistants.list():
        if existing_assistant.name == OPENAI_ASSISTANT_NAME:
            assistant = existing_assistant
            break

    # Create an assistant if we didn't find an existing one.
    assistant = assistant or await client.beta.assistants.create(
        name=OPENAI_ASSISTANT_NAME,
        model="gpt-4o",
    )

    # Update the assistant so that it always has the latest instructions
    assistant = await client.beta.assistants.update(
        assistant_id=assistant.id,
        instructions=OPENAI_ASSISTANT_INSTRUCTIONS,
    )

    # Create a thread for the conversation
    thread = await client.beta.threads.create()

    # Add the assistant and the new thread to the user session so that
    # we can reference it in other handlers.
    cl.user_session.set("assistant", assistant)
    cl.user_session.set("thread", thread)


@cl.on_message
async def handle_message(message: cl.Message) -> None:
    # Retrieve our Assistant and Thread from our user session.
    assistant = cl.user_session.get("assistant")
    thread = cl.user_session.get("thread")

    # Add the latest message to the thread.
    await client.beta.threads.messages.create(
        thread_id=thread.id,
        role="user",
        content=message.content,
    )

    # Stream a response to the Thread (called a "Run") using our Assistant.
    async with client.beta.threads.runs.stream(
        assistant_id=assistant.id,
        thread_id=thread.id,
        # Use our custom message handler.
        event_handler=MessageEventHandler(),
    ) as stream:
        await stream.until_done()
Get started with your AI SRE Agent
In this guide, we'll be covering:
Some background: why so many companies (including Aptible) are investing in building an AI Agent to supplement incident response
Some philosophical considerations: decisions we made with Aptible AI, what we’ve built so far, and a few pro tips
A complete step-by-step guide on how to build your own AI Agent, including:
How to set up an application in Chainlit
How to connect your application to an LLM (in this case, gpt-4o)
How to make your Agent faster and add real-time “typing” (similar to ChatGPT)
How to give your Agent a personality and specialization
How to give your Agent the ability to search a collection of files
How to integrate your Agent with external tools (in this case, PagerDuty)
🚨 Coming soon: open source infra knowledge graph 🚨
In the next few weeks, we’re dropping an open source AI-powered infrastructure knowledge graph that will allow you to build even more effective AI agents with access to a real-time map of your cloud infra. Here's how it works:
Pre-fetches data from cloud APIs across services like AWS, Kubernetes, Datadog, etc. so that you’re not making hundreds or thousands of API calls any time you need data.
Models cloud resources, their state, and historical changes as a connected graph, providing the context you need to answer the real questions.
Exposes an MCP server that allows you to build agents on top of real context rather than raw, disparate APIs.
And you’ll be able to install it using homebrew with one line of code.
Why use an AI Agent for incident response?
Incident response is messy. Knowledge silos end up forcing you to rely on a handful of subject matter experts and tenured engineers; SREs waste time on manual investigations during incidents at the expense of high impact work; and all of this leads to more downtime, higher MTTR, and potentially lost revenue. Aptible isn’t the first team to feel those pains, and we won’t be the last. But we’ve found a better way by implementing an AI Agent to act as an assistant to our SREs. Here’s why:
AI is really good at mundane, time consuming tasks like quickly retrieving information from disparate sources, summarizing huge amounts of data, and pattern matching. These benefits — when combined with human instinct, logic, and decision making skills — make AI ripe for augmenting on-call engineering teams during incidents.
At Aptible, we saw the potential here for our own incident response processes and decided to build an AI SRE Agent to help lower MTTR, eliminate knowledge silos, and decrease reliance on our most senior engineers.
We’ve spoken to quite a few engineering leads who are building the same type of tool for their teams, and we can all agree that building any kind of nontrivial AI assistant is hard for several reasons:
Given that AI is still so new, there are few established standards or best practices
Frameworks are changing all the time
So much information online is already outdated (or will be soon)
Because the demand for an AI Agent that actually works is so high — and since we’ve put so much time into building our own already — we’re going to share a detailed explanation of what we’ve built so far, the main considerations we had to take into account, and suggestions on how you can do it yourself.
What we’ve built so far + decisions we’ve made along the way
Is there already a tool for that?
🤔 Considerations: If you don’t need to build something new, then you shouldn’t. There are so. many. tools on the market. And depending on your specific use case, you may be able to find one that works for you.
The impetus for Aptible’s search and eventual development of our own incident response was that we struggled with knowledge silos and had a tendency to rely on three or four subject matter experts any time we encountered an issue with a particular system.
So we started with an open source tool called Danswer to improve information retrieval (similar to its popular commercial competitor, Glean). It plugged directly into Slack and could retrieve answers to natural language questions from various information sources. The problem was that it was limited to indexed data only (i.e., just our docs and our chat history).
⚒️ What we built: What we needed was a tool that could integrate with all our other systems (not just docs and Slack). We needed to retrieve logs and metrics, application health status, and generate reports and postmortems after our incidents were over. So we designed an AI Agent that’s essentially built on a series of integrations that allow you to connect with both real-time and indexed data. More on that later!
💡 Pro tip:
Before you decide to build your own product, look into what’s already available. A great place to start might be crowdsourcing ideas from Reddit (check out this thread, for one) or checking out some of the open source tools out there (here’s a good place to start in github if you’re looking for incident response tools specifically). There’s also a long list of open source AI Agents that you could start using tomorrow.
What’s your integration strategy?
🤔 Considerations: As mentioned above, the biggest consideration here is: what sort of information do you need your Agent to have access to? You could maybe get away with simply integrating it with third-party providers via an API, but if you need the integration to be more specific to your needs then you’ll need to be more thoughtful with how your integrations work.
By carefully considering what you’ll need to integrate with before you start building, you’ll save yourself some headache later on. Do you need your Agent to be able to execute custom scripts to query your databases? Do you need real-time retrieval of logs and metrics, and how will you design the Agent to retrieve that information? Will it return the link to the source? Will it return a chunk of lines of logs that you still have to manually sift through, or will it be able to deduce where the anomaly may be?
⚒️ What we built: At its core, Aptible AI is built on a series of integrations. An integration is more than just a connection to a third-party provider, it’s also a collection of configurations that are unique to how our team uses that provider. For example, Aptible AI supports multiple integrations for the same provider since we may want to use that provider in different ways. Different teams use Datadog differently and care about different metrics or use different tags, so each team can use the integration to the same tool in the way that they need.
Aptible AI supports a range of common SRE tooling, including:
Chat and other highly synchronous communications
Documentation and other knowledge repositories
Observability
Alerting
The actual implementation of these integrations fits into one of three categories of customizability:
For starters, you have a basic integration that requires no customization (PagerDuty is one example). Since it’s just pulling data from PagerDuty and adding it to the AI’s context, every single team that leverages the PagerDuty integration uses it in the same way.
Next, we have more customizable integrations (like the Datadog example from before) that are built on top of a generic InfluxDB integration but customized to the specific use cases of looking up container metrics and looking up restart activity.
Finally, there are fully custom tools that would likely make no sense to anyone outside of Aptible (an example here would be our integration that gets containers for an application). These are entirely specific to how we run our infrastructure and can be implemented either by a lightweight PubSub interface or a websocket-based “safe” proxy.
💡 Pro tip:
Less is more! If you give the model too many tools to choose from, it can start choosing incorrect tools and confuse itself. More on that in the next section
Speed vs. quality — what’s the right balance?
🤔 Considerations: So, first of all, no one wants an AI Agent that takes ages to respond. It defeats the whole purpose of building an Agent in the first place if you could do it faster yourself. There are two things to consider here: first of all (and we’ll get into this more in the next section), tweaking your prompt to ask the agent to be more brief will help to speed up your Agent a bit; secondly, you could consider using a faster model like 4o-mini, but you may be sacrificing a bit on the capabilities side (which might be fine, depending on your use case).
It’s also important to keep in mind that you must show the user that the bot has gotten the request and is working on a response (otherwise, they may get frustrated or confused and stop engaging). In the step-by-step lab below, we’ll show you how to enable real-time typing to indicate to the user that the Agent is about to respond (similar to ChatGPT, as you likely know). However, because we originally built Aptible AI as a Slack integration, we’ve been limited on how we can show that the Agent has seen the request and is working on gathering a response.
⚒️ What we built: We’ve spend a lot of time tweaking the prompts for Aptible AI (again, more on that in the next section) to ensure that it can respond quickly and effectively. As for the Slack integration, since we can’t show live typing, we tell the Agent to react to any question that it will react with a 👀 to indicate that the Agent has seen your request and is working on a response. We made sure to send that reaction as fast as possible to give our users confidence that we’re handling their request.
💡 Pro tip:
The model that you choose will impact speed; it’s important to strike the proper balance between speed and capability. Here is a detailed breakdown of the quality, speed, and price of leading LLM models to get you started.
So many models, how do you pick one?!
🤔 Considerations: Here’s the thing with models… new ones pop up every day, and there are several considerations to keep in mind when choosing one (mainly to do with your specific use cases). Should you self-host? Do you need your Agent to be conversational or task-based or both? Will it be conducting simple or complex tasks? Do you need real-time performance?
There’s no need for us to go through all the models that exist since that content is already all over the place (if you want a deep dive, this is a great resource), but we can walk through the decisions that we had to make when building Aptible AI and the options we considered.
It’s a tricky process because you can’t really avoid tradeoffs. If you need your Agent to conduct complex tasks, then you’ll have to sacrifice a bit on speed and cost.
The model’s size, capability, and architecture depend heavily on whether the tasks require simple classification or highly complex reasoning and interaction. If simple, a smaller, lightweight model like a decision tree, random forest, or simple neural network would suffice. If more complex, then you may consider a more powerful model like GPT-4, BERT, or a similar transformer-based architecture.
If you choose to self-host to avoid the security headache, you’ll likely have to sacrifice on features and functionality since your self-hosted version will lag behind the hosted options.
If you need your Agent to be trained on domain-specific knowledge, then you’ll need to curate or create your own datasets for fine-tuning. See if you can get away with using a pre-trained model that’s already been trained on large datasets to avoid the data quality issue (though this may be impossible depending on the data you need your Agent to have access to).
⚒️ What we built: We’re currently using GPT-4o for Aptible AI because we believe that it’s most likely to give us the highest quality answers. However, we recognize that customers using Aptible AI may want to use their own models (including self-hosted models). As such, we’re keeping that in mind as we build.
💡 Pro tip:
Your Agent will only be as smart as the information that you give it. LLMs need help understanding how and when to use the information you give it, and if you don’t give it instructions on how to interpret information, it’ll just make something up. Spend real effort upfront curating the information you feed to your LLM!
What about prompting techniques?
🤔 Considerations: You might be tempted to retrieve as much data as possible (documentation, Slack conversations, code repositories, issue trackers, etc.), throw it all at a RAG application**,** and ask it questions. But in our experience, there’s almost always going to be too much noise for this to be useful. That’s where prompt engineering comes in.
We’ve alluded to this already, but prompt engineering is a critical piece of the puzzle here (for a great overview on prompting techniques, check this out). The better your prompt engineering, the better your Agent will be.
For context, here are a few that we considered (over time) when building Aptible AI:
Zero-shot prompting: this is what most people do when they talk to ChatGPT; they just ask it a question then they get a response. If the response is bad, then they just ask the question differently.
Few-shot prompting: this is what slightly-more-experienced people do when talking to ChatGPT; they ask it a question and include examples of the output they want. You might use zero- and/or few-shot prompting for very simple tasks that the underlying model already knows how to do.
Retrieval Augmented Generation (RAG): this is a technique that allows the model to retrieve additional context and use it to answer the question. This is particularly useful for AI-powered document search (see also: Glean and Danswer).
ReAct: this technique allows an agent to generate “thoughts” and take “actions” in an iterative way to solve a problem, most similar to human reasoning. ReAct is great for moderately complex problems, like navigating references through documentation and tools in real time to compose an answer.
An important thing to keep in mind is that you can mix and match with these techniques (we’ll cover the multi-agent approach next). Here’s what we did…
⚒️ What we built: Because Aptible AI has a multi-agent structure (more on that later), we’ve implemented a mix of ReAct and RAG depending on the complexity of the task/question.
So when you ask the AI a question, we hand off all of the integrations (with instructions on how to use them) to the AI. The AI then makes decisions about what tools to call based on the information it has available to it. After each integration call, the AI has the option of deciding it has enough information to provide an answer, or deciding that additional integrations are relevant and could potentially yield additional information.
Throughout the process, we’re trying to help the AI make better decisions about what integrations to leverage via a few different mechanisms:
Extensive prompt engineering for the integrations, to make sure it’s really clear when and how to use each integration, as well as how to interpret the output.
We’ve built a self-rating system that asks the AI to self-rate the value of the response from an integration. Even when the AI makes a dumb decision in calling a integration (or provides bad inputs), it’s typically able to recognize that after the fact if you ask it to self-rate whether or not the output of the integration was useful. We can then use that to influence how much a specific output factors into a response. We can also block the AI from proceeding if it’s consistently making bad decisions.
We’ve implemented Naïve Bayes based on past experience. For example, if most of the time you call integration A and then B, and that yields useful results, it’s probably useful to continue doing so. The Agent can also use things like comparing to previous similar incidents to further narrow what integrations are useful, and when, in specific scenarios.
💡 Pro tip:
To avoid nonsense answers that sound correct but aren’t, be sure to take a step back and consider where your most useful information typically comes from for the problems that you’re trying to solve with AI – then design your Agent based on that.
Multi-agent or single agent?
🤔 Considerations: Multi-agent approaches are becoming more popular, but they can be complicated and potentially unnecessary depending on your use case. It can be quite useful to have a team of agents working together with different techniques to solve complex problems.
For example, if you ask your bot a question in Slack that has nothing to do with your specific infrastructure (maybe you just want to know who won the World Series in 1995), you could have an Agent built on zero-shot prompting to simply act as a ChatGPT that’s integrated with your Slack (or wherever you have it).
But if your question or need is complex, it would be useful to have a team of Agents that basically act as your little research team, gathering and analyzing data from disparate sources in an intelligent way.
⚒️ What we built: Aptible AI uses a multi-agent approach, starting with a broker Agent that determines what type of question or task needs to be addressed.
💡 Pro tip: It’s easier to refactor into a multi-agent approach than out of it! So make sure you need it before you start building your Agent that way.
What do you want your bot to specialize in?
🤔 Considerations: In the same vein as making your agent fast, you also have to consider exactly how you want to customize it. This not only means determining how much information it needs to have access to (which will affect speed and quality), but it also means giving it a personality if you’d like 😄
Just like a human, your Agent has to specialize in the problem(s) you're trying to solve in order to be most useful and avoid spewing incorrect or misleading information. This means adjusting the system prompt. What you need to consider here is: how strict do you want your system prompt? Do you want your Agent to try to answer as many questions as possible? Or would you prefer that it outright denies any questions that it won’t be certain about? You could even design it to express uncertainty so that it doesn’t sound too authoritative and lead to confusion or distrust among your engineering teams.
⚒️ What we built: Our system prompt is very strict — Aptible AI outright refuses to answer questions that aren't related to incidents in order to mitigate the possibility for wrong answers or hallucinations.
💡 Pro tip:
If your implementation is sophisticated enough, you could consider customizing your Agent’s behavior based on who it’s talking to (i.e., you can ask it to be more socratic and verbose for junior team members to help them learn, or to be more terse and to-the-point for senior engineers, etc).
Ok, let’s jump in! Below, you’ll add speed and personality to your Agent, giving it the ability to type in real-time and testing out a few system prompts to show how your prompt engineering affects how the Agent responds.
What information should my Agent have access to?
🤔 Considerations: Before you start feeding your LLM all of the information you can possibly find, think strategically about what exactly you want the Agent to be able to do and what its purpose is. Later on in the guide, we’ll show you how to give your bot the ability to search a collection of files effectively. Just keep in mind that the more information you give it, the trickier it can become to maintain high levels of accuracy.
🛠️ What we built: Aptible AI was built for the very specific purpose of helping our SRE team and on-call engineers to debug and resolve production issues faster. So we’ve given it access to our runbooks and other documentation and we’ve designed it to gather and surface as much relevant information about the incident as it can. It then returns the data to Slack in a dynamic dashboard for our engineers to then investigate.
We’ve found that by simply surfacing the information quickly, the Agent provides instant and consistent value versus trying to answer every single question (thereby increasing the likelihood of AI hallucination).
💡 Pro tip:
Resist the temptation to just plug the LLM into your existing search infrastructure! It may seem simpler, but LLMs perform better if you allow them to search semantically (i.e. using vectors) instead of trying to come up with keywords it thinks might be relevant.
Can’t forget about security…
🤔 Considerations: Here’s a topic that comes up a lot when we chat with Aptible AI early users. Most engineering teams eventually have to face their security team when it comes to implementing new tools, and it’s critical to ensure that the data is safe (especially if you’re working in a highly regulated industry). So the first thing you have to do is to know your organization’s AI security policy, then there are a few things you can do to protect against potential data leaks or external threats.
⚒️ What we built: For starters, we use a model that doesn’t train on our data. We're still doing a lot of discovery around what customers need regarding security, whether that's self-hosting or something else! Stay tuned.
💡 Pro tip:
Be careful with the data you give your AI access to or include in prompts, especially if that data shouldn’t be shared with the end user! If you need to include unpredictable data like logs, consider using at tool like Nightfall to ensure what’s passed to the LLM and end users is sanitized
Oh, and of course, it needs to be usable!
🤔 Considerations: How do you plan to use your Agent? Does it need to have a UI? Will it be used across the organization?
You likely don’t need to spend time reinventing the wheel when it comes to the UX around your bot. Frameworks like Chainlit, Gradio, and Streamlit give you out-of-the-box tools for building user interfaces and/or integrating with your other workflow tools like Slack. Use one of these tools to start so that you can focus on getting good answers out of your Agent!
⚒️ What we built: Because our Agent was built specifically for incident response — and because we handle incidents within Slack — we mainly use Slack as our UI. It has its limitations, though, so we do our best to work around them (i.e. instead of showing that the Agent is responding by mimicking typing as seen in ChatGPT, the bot instead react to the question in Slack with an 👀 emoji). We also designed a web UI for configuration, reporting, auditing, and analytics.
💡 Pro tip:
Be sure to keep your LLM code as decoupled as you can, so that you can easily refactor away into another UX if the need arises.
Okay, let’s move on from the theoretical talk about models, techniques, and frameworks! Time to get your hands dirty and start building your own Agent.
Hands-on lab: A step-by-step guide on how to build your own Agent for SRE Teams
In the following lab, we'll show you how to:
1. Set up an Agent in Chainlit
2. Connect your Agent to an LLM (in this case, gpt-4o)
3. Make your Agent faster and add real-time “typing” (similar to ChatGPT)
4. Give your Agent a personality and specialization
5. Give your Agent the ability to search a collection of files
6. Integrate your Agent with external tools (in this case, PagerDuty)
Let's dive right in.
Set up a Chainlit application
Before we go delving into the endless rabbit hole of building AI, we’re going to set ourselves up for success by setting up Chainlit, a popular framework for building conversational assistant interfaces.
Why Chainlit?
Chainlit provides an opinionated set of building blocks for modeling conversational interactions — like threads, messages, and steps — as well as a ChatGPT-like user interface for interacting with the LLM.
It also offers out-of-the-box integrations with popular chat tools like Slack and Teams, as well as libraries for interfacing with popular tooling like React and FastAPI, so you can build it into a larger application, if you want.
In short: Chainlit is going to eliminate a lot of the scaffolding and grunt work for us so that we can focus on developing our AI assistant and getting feedback from our users, instead of fiddling with UI and configuration.
The Goal
By the end of this lab, you’ll have a working Chainlit application that will simply echo back what you say. We’ll jump into the AI integration in the next article.
Prerequisites
Before we get started, you’ll need to get set up with a few things:
A working Python 3.12+ environment. We recommend using pyenv.
A Python package manager. We’ll be using Poetry, but you can use whatever you’re comfortable with.
Once you’re set up, continue on.
Project Setup
First, set up your project, and add chainlit as a dependency:
mkdir roger
cd roger
poetry init --no-interaction
poetry add chainlit
Chainlit Boilerplate
Next, create an app.py file in the root of your project with the following content:
import chainlit as cl


@cl.on_message
async def handle_message(message: cl.Message) -> None:
    # Echo the message back to the user.
    await cl.Message(
        content=f"Received: {message.content}",
    ).send()
The code above is registering the handle_message function with Chainlit, so that any time a message is received, this function will run.
For the moment, our function simply echoes the message back to the user, prefixed with “Received: ”.
Try it out
Finally, spin it up! You can use --watch to hot-reload your code when you make changes.
poetry run chainlit run app.py --watchRunning this command will start your Chainlit app and open your browser to its UI, where you can send a message and get a response back:
Make your application smarter by connecting an LLM
With our Chainlit app scaffolded, we can connect it to an LLM so that we can talk to it and get a human-like response.
We’ll use OpenAI’s hosted gpt-4o model for simplicity, but using another provider is just a matter of syntax.
The Goal
By the end of this article, you’ll be able to prompt the gpt-4o model and get a response, similar to how you’d interact with ChatGPT. We’ll also make sure that the bot maintains conversation context so that you can ask follow-up questions.
Prerequisites
Before you get started, you’ll need:
An OpenAI account and an API key
Configure an OpenAI API client
First, we’ll configure an API client to interface with OpenAI’s APIs. Add the following code to the top of your app.py:
import os
from openai import AsyncOpenAI

##
# Settings
#
try:
    OPENAI_API_KEY = os.environ["OPENAI_API_KEY"]
except KeyError as ex:
    raise LookupError(f"Missing required environment variable: {ex}")


client = AsyncOpenAI(api_key=OPENAI_API_KEY)

# ...
Send Messages to the LLM
Next, we’ll need to update our handle_message function to send the user’s message to OpenAI and get a response instead of just echoing it back. Replace your handle_message function with this one:
# ...

@cl.on_message
async def handle_message(message: cl.Message) -> None:
    # Retrieve the response from the LLM
    response = await client.chat.completions.create(
        messages=[{"content": message.content, "role": "user"}],
        model="gpt-4o",
    )

    await cl.Message(content=response.choices[0].message.content).send()
Try it out
Now, if you run your application (or if you left it running with the --watch flag), you’ll be able to ask a question and get a response.
Curing Amnesia
If you’ve played around a bit and asked follow-up questions, you may have noticed that the bot doesn’t “remember” anything you’ve talked about. For example:
This is happening because every time we send a message, we’re sending only that one message to the LLM, which has no notion of the “conversation” by default.
To cure this amnesia, we’ll need to send all of the messages in the conversation every time we send a new one.
Chainlit makes this easy for us by providing a cl.chat_context.to_openai() helper, which gives us all of the messages exchanged so far, conveniently in the format that OpenAI (and most other providers) expects.
Update your handle_message function to prepend historical messages before the latest one:
# ...

@cl.on_message
async def handle_message(message: cl.Message) -> None:
    # Retrieve the response from the LLM
    response = await client.chat.completions.create(
        messages=[
            # Prepend all previous messages to maintain the conversation.
            *cl.chat_context.to_openai(),
                {"content": message.content, "role": "user"}
            ],
        model="gpt-4o",
    )

    await cl.Message(content=response.choices[0].message.content).send()
Now we can ask follow-up questions!
Faster feedback 🏎️
After completing the first few steps, you may have noticed that when you ask questions that require a long response, there’s a delay before you see anything. This can make for a poor user experience (especially later in step 6, when we start adding long-running tool calls) so let’s fix that.
The Goal
At the end of this step, you’ll be able to see your bot “type” in real-time, similar to ChatGPT.
Stream it
To get real-time message updates, we need to update our implementation to use a “stream”. Basically, whenever we receive a message, we’ll respond immediately with an empty message, start a stream with the LLM, and update our empty message every time we receive a new chunk of the response from the stream.
This might sound complicated, but it’s surprisingly easy! Update your handle_message function as follows:
# ...
@cl.on_message
async def handle_message(message: cl.Message) -> None:
    # Send an empty initial message that we can update with a streaming
    # response.
    message = cl.Message(content="")
    await message.send()

    # Stream the response from the LLM
    stream = await client.chat.completions.create(
        messages=[
            # Prepend all previous messages to maintain the conversation.
            *cl.chat_context.to_openai(),
                {"content": message.content, "role": "user"}
            ],
        model="gpt-4o",
        stream=True,
    )
    # Update the existing (initially-empty) message with new content
    # from each "chunk" in the stream.
    async for chunk in stream:
        if token := chunk.choices[0].delta.content:
            await message.stream_token(token)
    # Send a final update to let the message know it's complete.
await message.update()🧑💻 So, here's the complete code so far:
import os
import chainlit as cl

from openai import AsyncOpenAI

##
# Settings
#
try:
    OPENAI_API_KEY = os.environ["OPENAI_API_KEY"]
except KeyError as ex:
    raise LookupError(f"Missing required environment variable: {ex}")

client = AsyncOpenAI(api_key=OPENAI_API_KEY)


@cl.on_message
async def handle_message(message: cl.Message) -> None:
    # Send an empty initial message that we can update with a streaming
    # response.
    message = cl.Message(content="")
    await message.send()

    # Stream the response from the LLM
    stream = await client.chat.completions.create(
        messages=[
            # Prepend all previous messages to maintain the conversation.
            *cl.chat_context.to_openai(),
                {"content": message.content, "role": "user"}
            ],
        model="gpt-4o",
        stream=True,
    )

    # Update the existing (initially-empty) message with the content
    # from each "chunk" in the stream.
    async for chunk in stream:
        if token := chunk.choices[0].delta.content or "":
            await message.stream_token(token)

    # Send a final update to let the message know it's complete.
    await message.update()
Try it out
Now, when you ask a question, you should see your bot “typing” in real-time!
Give your Agent a specialization and personality 💁♂️
By this point, we’ve built a lightweight clone of ChatGPT. That’s cool and all, but what we really want is an assistant that will help us perform a specific task: in this case, we want it to troubleshoot incidents, like an SRE would.
To get there, we’ll start by refactoring our agent into a custom OpenAI Assistant, which will give us control over the system prompt (as well as the ability to give the LLM access to tools like file search and function calls, which we’ll cover later).
The Goal
By the end of this step, you’ll have refactored your bot into a custom “Assistant” and customize its system prompt to give it its own “personality”. Your code will also use a “thread”, which will persist messages using the OpenAI API, instead of having to send all messages every time we receive a new one.
Create an Assistant & Thread
Creating an Assistant is straightforward: we just need to call the OpenAI Assistants API. However, we only want to do this once when the application starts up, so we can’t put that API call in the handle_message function.
Instead, we’ll use another Chainlit hook — on_chat_start, which will only run once when the application first starts — to set up our assistant.
Add this to your app.py:
# ...

# Give your assistant a name.
OPENAI_ASSISTANT_NAME = "roger"

# Give your assistant some custom instructions.
OPENAI_ASSISTANT_INSTRUCTIONS = """
You are an expert Site Reliability Engineer, tasked with helping
the SRE team respond to and resolve incidents.

If you are presented with a question that does not seem like it
could be related to infrastructure, begin your response with a polite
reminder that your primary responsibilities are to help with incident
response, before fully answering the question to the best of your ability.
"""


@cl.on_chat_start
async def handle_chat_start() -> str:
        assistant = None

        # Try to find an existing assistant so we don't create duplicates.
        async for existing_assistant in await client.beta.assistants.list():
              if existing_assistant.name == OPENAI_ASSISTANT_NAME:
                  assistant = existing_assistant
                  break

        # Create an assistant if we didn't find an existing one.
    assistant = assistant or await client.beta.assistants.create(
        name=OPENAI_ASSISTANT_NAME,
        model="gpt-4o",
    )

    # Update the assistant so that it always has the latest instructions
    assistant = await client.beta.assistants.update(
            assistant_id=assistant.id,
        instructions=OPENAI_ASSISTANT_INSTRUCTIONS,
    )

    # Create a thread for the conversation
    thread = await client.beta.threads.create()

    # Add the assistant and the new thread to the user session so that
    # we can reference it in other handlers.
    cl.user_session.set("assistant", assistant)
    cl.user_session.set("thread", thread)

# ...
Note: it’s technically possible to give the assistant a custom system prompt by providing an initial system-type message in the message history in handle_message. However, we’re refactoring into an assistant with custom instructions because it unlocks several other capabilities that we’ll use in the near future.
Refactor Message Handling to use the Assistant
Now that we have an Assistant and a Thread for the conversation, we can refactor our message handler to use them.
First, we need an AssistantEventHandler to tell our new Assistant object how to handle the various events that occur during a conversation.
Add the following to your app.py:
from typing import override
from openai import AsyncAssistantEventHandler
from openai.types.beta.threads import Message, TextDelta, Text

# ...

class MessageEventHandler(AsyncAssistantEventHandler):
    """An event handler for updating a Chainlit message while streaming an OpenAI response."""

    message: cl.Message

    @override
    async def on_text_created(self, text: Text) -> None:
        """Create a new message so that we can update it."""
        self.message = cl.Message(content="")
        await self.message.send()

    @override
    async def on_text_delta(self, delta: TextDelta, snapshot: Text) -> None:
        """Update the message with the latest text delta streamed to us."""
        await self.message.stream_token(delta.value)

    @override
    async def on_message_done(self, message: Message) -> None:
        """Update the message with the final text when the stream completes."""
        await self.message.update()
Now, we just need to adjust our handle_message function to use all of our new toys! Update your handle_message function to the following:
# ...

@cl.on_message
async def handle_message(message: cl.Message) -> None:
        # Retrieve our Assistant and Thread from our user session.
    assistant = cl.user_session.get("assistant")
    thread = cl.user_session.get("thread")

    # Add the latest message to the thread.
    await client.beta.threads.messages.create(
        thread_id=thread.id,
        role="user",
        content=message.content,
    )

        # Stream a response to the Thread (called a "Run") using our Assistant.
    async with client.beta.threads.runs.stream(
        assistant_id=assistant.id,
        thread_id=thread.id,
        # Use our custom message handler.
        event_handler=MessageEventHandler(),
    ) as stream:
await stream.until_done()🧑💻 Now here's the complete code so far:
import os
from typing import override
import chainlit as cl

from openai import AsyncOpenAI, AsyncAssistantEventHandler
from openai.types.beta.threads import Message, TextDelta, Text


##
# Settings
#
try:
    OPENAI_API_KEY = os.environ["OPENAI_API_KEY"]
except KeyError as ex:
    raise LookupError(f"Missing required environment variable: {ex}")

# Give your assistant a name.
OPENAI_ASSISTANT_NAME = "roger"

# Give your assistant some custom instructions.
OPENAI_ASSISTANT_INSTRUCTIONS = """
You are an expert Site Reliability Engineer, tasked with helping
the SRE team respond to and resolve incidents.

If you are presented with a question that does not seem like it
could be related to infrastructure, begin your response with a polite
reminder that your primary responsibilities are to help with incident
response, before fully answering the question to the best of your ability.
"""


client = AsyncOpenAI(api_key=OPENAI_API_KEY)


class MessageEventHandler(AsyncAssistantEventHandler):
    """An event handler for updating a Chainlit message while streaming an OpenAI response."""

    message: cl.Message

    @override
    async def on_text_created(self, text: Text) -> None:
        """Create a new message so that we can update it."""
        self.message = cl.Message(content="")
        await self.message.send()

    @override
    async def on_text_delta(self, delta: TextDelta, snapshot: Text) -> None:
        """Update the message with the latest text delta streamed to us."""
        await self.message.stream_token(delta.value)

    @override
    async def on_message_done(self, message: Message) -> None:
        """Update the message with the final text when the stream completes."""
        await self.message.update()


@cl.on_chat_start
async def handle_chat_start() -> str:
    assistant = None

    # Try to find an existing assistant so we don't create duplicates.
    async for existing_assistant in await client.beta.assistants.list():
        if existing_assistant.name == OPENAI_ASSISTANT_NAME:
            assistant = existing_assistant
            break

    # Create an assistant if we didn't find an existing one.
    assistant = assistant or await client.beta.assistants.create(
        name=OPENAI_ASSISTANT_NAME,
        model="gpt-4o",
    )

    # Update the assistant so that it always has the latest instructions
    assistant = await client.beta.assistants.update(
        assistant_id=assistant.id,
        instructions=OPENAI_ASSISTANT_INSTRUCTIONS,
    )

    # Create a thread for the conversation
    thread = await client.beta.threads.create()

    # Add the assistant and the new thread to the user session so that
    # we can reference it in other handlers.
    cl.user_session.set("assistant", assistant)
    cl.user_session.set("thread", thread)


@cl.on_message
async def handle_message(message: cl.Message) -> None:
    # Retrieve our Assistant and Thread from our user session.
    assistant = cl.user_session.get("assistant")
    thread = cl.user_session.get("thread")

    # Add the latest message to the thread.
    await client.beta.threads.messages.create(
        thread_id=thread.id,
        role="user",
        content=message.content,
    )

    # Stream a response to the Thread (called a "Run") using our Assistant.
    async with client.beta.threads.runs.stream(
        assistant_id=assistant.id,
        thread_id=thread.id,
        # Use our custom message handler.
        event_handler=MessageEventHandler(),
    ) as stream:
        await stream.until_done()
Get access to the infra knowledge graph that power's Aptible's AI SRE Agent 👇
Give your Agent access to your documentation
Now that we’re using Assistants and Threads, we can start customizing behavior. To start, we’ll give our Assistant access to some of our internal documentation so that it can provide responses that are more tailored to our use case.
The Goal
By the end of this section, you’ll have given your bot the ability to search a collection of files (e.g., your SRE runbooks and other internal documentation) when responding to prompts.
For simplicity, we’ll implement this as a folder full of files that get uploaded into a vector store and provided to our Assistant.
Creating a Vector Store
The first thing we need to do is create a vector store and provide it to our Assistant.
First, update the beginning of our handle_chat_start function to include the following:
# ...
@cl.on_chat_start
async def handle_chat_start() -> str:
    vector_store = None
    # Try to find an existing vector store so we don't create duplicates.
    async for existing_vector_store in await client.beta.vector_stores.list():
        if existing_vector_store.name == OPENAI_ASSISTANT_NAME:
            vector_store = existing_vector_store
            break
    # Create a vector store if we didn't find an existing one.
    vector_store = vector_store or await client.beta.vector_stores.create(
        name=OPENAI_ASSISTANT_NAME,
    )

    assistant = None
    # ...
# ...
Next, update the call to client.beta.assistants.update() to give the assistant access to the vector store and enable the file_search tool.
assistant = await client.beta.assistants.update(
    assistant_id=assistant.id,
    instructions=OPENAI_ASSISTANT_INSTRUCTIONS,
    tools=[{"type": "file_search"}],
    tool_resources={
        "file_search": {
            "vector_store_ids": [vector_store.id],
        }
    },
)
Upload Documentation
Finally, we’ll need to upload our documentation that we want our assistant to reference when answering prompts.
First, we’ll need to create a folder where we’ll put our documents:
mkdirNext, we’ll collect our documentation and put it in that folder. For testing purposes, I’ve added the following fake document to my folder:
---
title: SRE Runbook
url: <https://internal.aptible.com/docs/runbooks/sre>
Finally, we’ll update our handle_chat_start function to automatically upload our documents to the vector store we created earlier. Add the following code just after where we create the vector store:
if documents := list(Path("./docs").glob("**/*.md")):
  await client.beta.vector_stores.file_batches.upload_and_poll(
      vector_store_id=vector_store.id,
      files=(f.open("rb") for f in documents),
  )
ℹ️ Note:
For now, we’ll only support
.mdfiles, but OpenAI supports lots of different file types, so feel free to update the glob pattern to whatever makes sense for your use case!
This will automatically upload all of the files in the ./docs folder and add them to our vector store.
Add an indicator
File search can sometimes take a while, especially for larger datasets. In those cases, you’ll probably want to let the user know what’s going on so they don’t get frustrated.
Luckily, Chainlit makes this easy by providing a Step class that we can use to tell the user that something’s happening in the background. We can use the Step class in conjunction with the MessageEventHandler we built earlier, and add an indicator any time a tool is called.
Add the following to your MessageEventHandler:
class MessageEventHandler(AsyncAssistantEventHandler):
    # ...

    @override
    async def on_tool_call_created(self, tool_call: ToolCall) -> None:
        """Create a new step in the conversation to indicate that a tool is being used."""
        async with cl.Step(tool_call.type) as step:
            self.step = step
Try it out
Now that you’ve uploaded some of your own documentation, try asking some questions that are more specific to your use case, and see what you get!
For our test case, it correctly referenced our runbook when asked about high CPU utilization on a customer database:
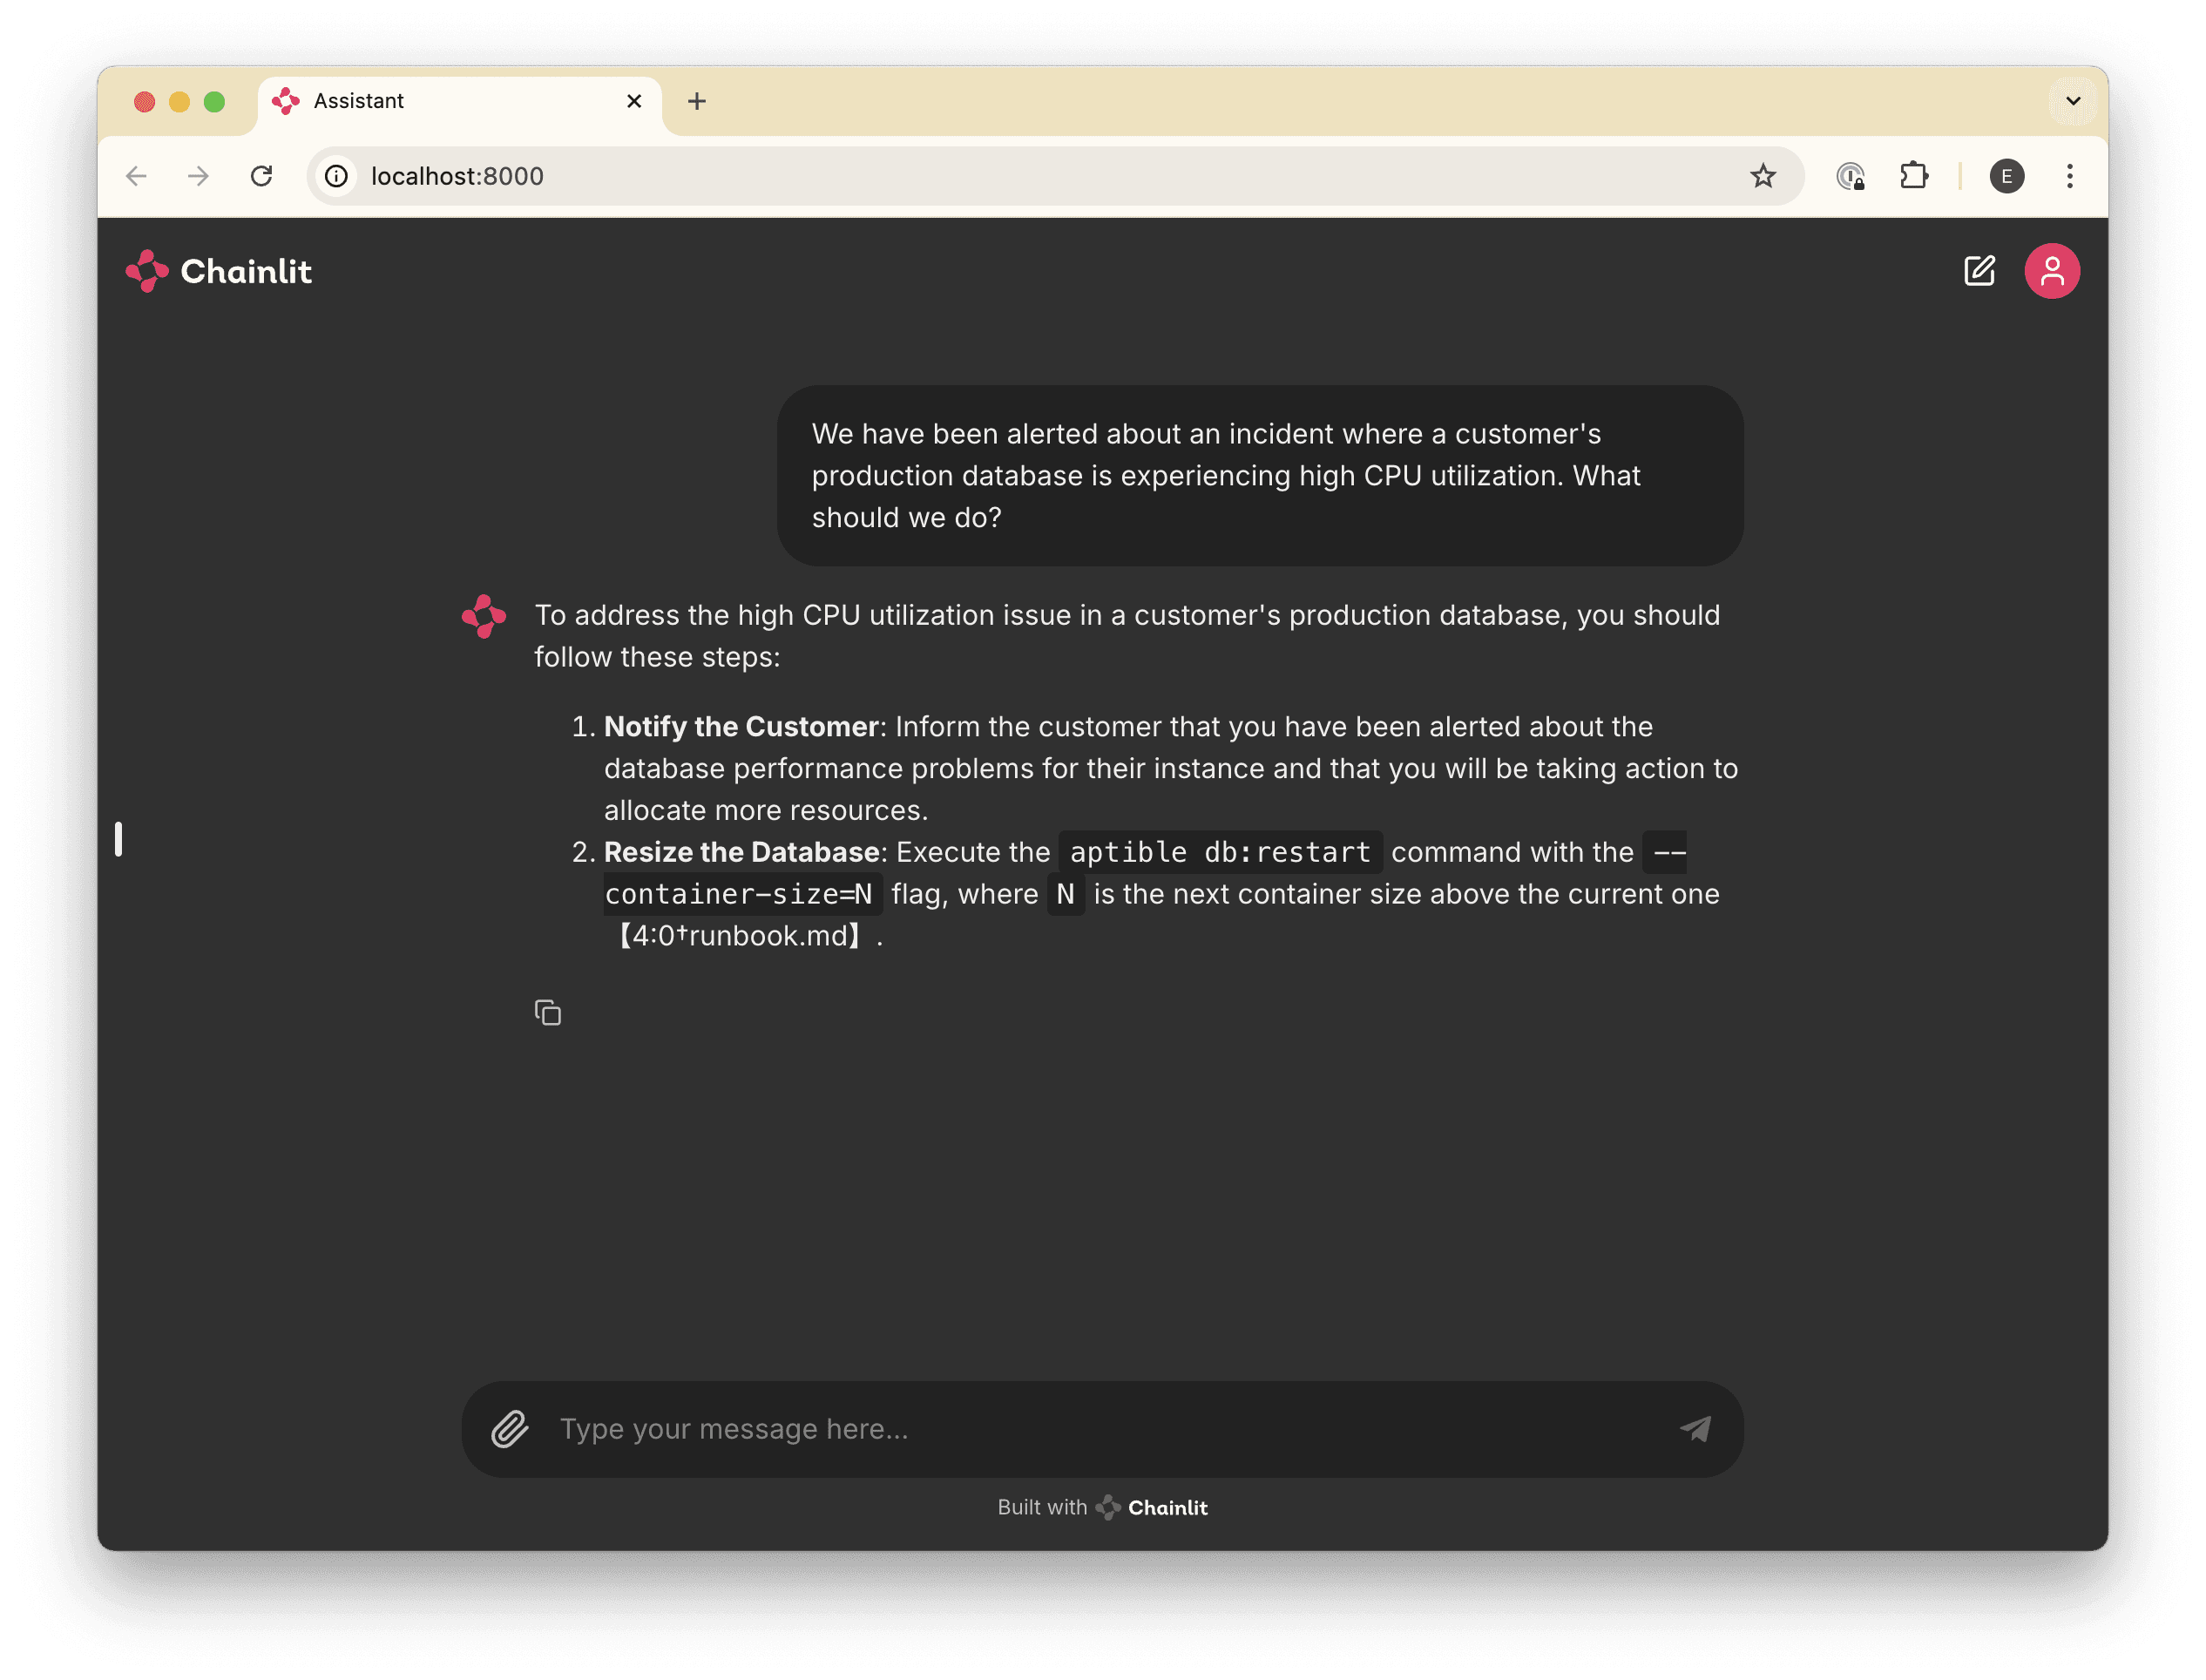
🧑💻 For reference, here's the complete code so far:
import os
from pathlib import Path
from typing import override
import chainlit as cl

from openai import AsyncOpenAI, AsyncAssistantEventHandler
from openai.types.beta.threads import Message, TextDelta, Text
from openai.types.beta.threads.runs.tool_call import ToolCall

##
# Settings
#
try:
    OPENAI_API_KEY = os.environ["OPENAI_API_KEY"]
except KeyError as ex:
    raise LookupError(f"Missing required environment variable: {ex}")

# Give your assistant a name.
OPENAI_ASSISTANT_NAME = "roger"

# Give your assistant some custom instructions.
OPENAI_ASSISTANT_INSTRUCTIONS = """
You are an expert Site Reliability Engineer, tasked with helping
the SRE team respond to and resolve incidents.

If you are presented with a question that does not seem like it
could be related to infrastructure, begin your response with a polite
reminder that your primary responsibilities are to help with incident
response, before fully answering the question to the best of your ability.
"""

client = AsyncOpenAI(api_key=OPENAI_API_KEY)

class MessageEventHandler(AsyncAssistantEventHandler):
    """An event handler for updating a Chainlit message while streaming an OpenAI response."""

    message: cl.Message

    @override
    async def on_text_created(self, text: Text) -> None:
        """Create a new message so that we can update it."""
        self.message = cl.Message(content="")
        await self.message.send()

    @override
    async def on_text_delta(self, delta: TextDelta, snapshot: Text) -> None:
        """Update the message with the latest text delta streamed to us."""
        await self.message.stream_token(delta.value)

    @override
    async def on_message_done(self, message: Message) -> None:
        """Update the message with the final text when the stream completes."""
        await self.message.update()

    @override
    async def on_tool_call_created(self, tool_call: ToolCall) -> None:
        """Create a new step in the conversation to indicate that a tool is being used."""
        async with cl.Step(tool_call.type) as step:
            self.step = step

@cl.on_chat_start
async def handle_chat_start() -> str:
    vector_store = None

    # Try to find an existing vector store so we don't create duplicates.
    async for existing_vector_store in await client.beta.vector_stores.list():
        if existing_vector_store.name == OPENAI_ASSISTANT_NAME:
            vector_store = existing_vector_store
            break

    # Create a vector store if we didn't find an existing one.
    vector_store = vector_store or await client.beta.vector_stores.create(
        name=OPENAI_ASSISTANT_NAME,
    )

    if documents := list(Path("./docs").glob("**/*.md")):
        await client.beta.vector_stores.file_batches.upload_and_poll(
            vector_store_id=vector_store.id,
            files=(f.open("rb") for f in documents),
        )

    assistant = None

    # Try to find an existing assistant so we don't create duplicates.
    async for existing_assistant in await client.beta.assistants.list():
        if existing_assistant.name == OPENAI_ASSISTANT_NAME:
            assistant = existing_assistant
            break

    # Create an assistant if we didn't find an existing one.
    assistant = assistant or await client.beta.assistants.create(
        name=OPENAI_ASSISTANT_NAME,
        model="gpt-4o",
    )

    # Update the assistant so that it always has the latest instructions
    assistant = await client.beta.assistants.update(
        assistant_id=assistant.id,
        instructions=OPENAI_ASSISTANT_INSTRUCTIONS,
        tools=[{"type": "file_search"}],
        tool_resources={
            "file_search": {
                "vector_store_ids": [vector_store.id],
            }
        },
    )

    # Create a thread for the conversation
    thread = await client.beta.threads.create()

    # Add the assistant and the new thread to the user session so that
    # we can reference it in other handlers.
    cl.user_session.set("assistant", assistant)
    cl.user_session.set("thread", thread)

@cl.on_message
async def handle_message(message: cl.Message) -> None:
    # Retrieve our Assistant and Thread from our user session.
    assistant = cl.user_session.get("assistant")
    thread = cl.user_session.get("thread")

    # Add the latest message to the thread.
    await client.beta.threads.messages.create(
        thread_id=thread.id,
        role="user",
        content=message.content,
    )

    # Stream a response to the Thread (called a "Run") using our Assistant.
    async with client.beta.threads.runs.stream(
        assistant_id=assistant.id,
        thread_id=thread.id,
        # Use our custom message handler.
        event_handler=MessageEventHandler(),
    ) as stream:
        await stream.until_done()
Integrate your agent with external tools
Our Agent is now able to retrieve data from our curated internal documentation, which is useful if you have good documentation. However, a lot of time in incident management is often spent investigating things that aren’t covered by the docs: scanning alerts, reading logs, interpreting metrics, etc.
For those things, we want to give our assistant the ability to call external APIs — and more broadly, execute functions that we define — so that it can gather more context on an as-needed basis.
To do this, we’ll leverage the “function calling” capabilities of the model to execute functions that we define.
The Goal
By the end of this step, you’ll have given your bot the ability to use an external tool (a fake PagerDuty tool) to retrieve information when answering prompts.
Define the (fake) Tool
First, let’s add a new function to our app.py called get_pagerduty_alert_details.
import json
from datetime import datetime, timedelta

# ...

async def get_pagerduty_alert_details(pagerduty_alert_url: str) -> dict:
    """Return the details of the PagerDuty alert at the given URL."""
    # TODO: Make this implementation real!
    return json.dumps({
        "alert": {
            "id": "PT4KHLK",
            "type": "alert",
            "summary": "A customer database is experiencing high CPU usage.",
            "self": pagerduty_alert_url,
            "html_url": pagerduty_alert_url,
            "created_at": (datetime.now() - timedelta(minutes=5)).isoformat(),
            "status": "resolved",
            "alert_key": "baf7cf21b1da41b4b0221008339ff357",
            "suppressed": False,
            "severity": "critical",
        }
    })
Tell the LLM how to use it
Next, we need to tell the LLM how to call our tool. OpenAI expects tool definitions in JSONSchema format.
Update your call to client.beta.assistants.update() to include a new tool definition after the file_search tool that we already have.
assistant = await client.beta.assistants.update(
    assistant_id=assistant.id,
    instructions=OPENAI_ASSISTANT_INSTRUCTIONS,
    tools=[
        # Our existing file search tool
        {"type": "file_search"},
        # Our new pagerduty alert tool
        {
            "type": "function",
            "function": {
                "name": get_pagerduty_alert_details.__name__,
                "description": get_pagerduty_alert_details.__doc__,
                "parameters": {
                    "type": "object",
                    "properties": {
                        "pagerduty_alert_url": {
                            "type": "string",
                            "format": "uri",
                            "description": "The PagerDuty alert URL. For example, '<https://example.pagerduty.com/alerts/Q3YDP8VKEZ9THL>'.",
                        },
                    },
                    "required": ["pagerduty_alert_url"],
                    "additionalProperties": False,
                },
            }
        }
    ],
    tool_resources={
        "file_search": {
            "vector_store_ids": [vector_store.id],
        }
    },
)
Update the message handler to handle tool calls
Our MessageEventHandler currently handles back-and-forth message events, but calling tools requires some special handling.
When responding to your prompt, the LLM will decide which tools it should call (if any) and return to you one or more “tool call” definitions in the response payload, and tell you that the response “requires action”. In order to actually execute the function, we need to handle these “requires action” responses.
We can do this by updating our MessageEventHandler class to implement the on_event method, along with a new handle_requires_action method for executing our function call and adding the result to the running thread:
from openai.types.beta import AssistantStreamEvent
from openai.types.beta.threads import Run

# ...

class MessageEventHandler(AsyncAssistantEventHandler):
    # ...

    @override
    async def on_event(self, event: AssistantStreamEvent) -> None:
        """Handle specific events."""
        if event.event == "thread.run.requires_action":
            run_id = event.data.id  # Retrieve the run ID from the event data
            self.current_run.id = run_id
            await self.handle_requires_action(event.data, run_id)

    async def handle_requires_action(self, run: Run, run_id: str) -> None:
        """Handle events that require an action to be taken, like tool calls."""
        tool_outputs = []

        # Execute each tool call and collect the result.
        for tool in run.required_action.submit_tool_outputs.tool_calls:
            func_name = tool.function.name
            func_args = tool.function.arguments

            # TODO: Build a function map with a decorator instead of looking up
            # functions in globals.
            if func_to_call := globals()[func_name]:
                try:
                    # Parse the func_args JSON string to a dictionary
                    tool_outputs.append(
                        {
                            "tool_call_id": tool.id,
                            "output": await func_to_call(**json.loads(func_args)),
                        }
                    )
                except TypeError as ex:
                    print(f"Error calling function {func_name!r}: {str(ex)}")
            else:
                print(f"Function {func_name!r} not found")

        # Submit tool outputs to the conversation thread.
        async with client.beta.threads.runs.submit_tool_outputs_stream(
            thread_id=self.current_run.thread_id,
            run_id=run_id,
            tool_outputs=tool_outputs,
            event_handler=MessageEventHandler(),
        ) as stream:
            await stream.until_done()

    # ...
Tweak the prompt
It can often be helpful to remind the LLM that it should attempt to use the tools you’ve provided when applicable. Add a line like this one to the end of your prompt:
Use the provided tools to gather additional context about the incident, if applicable.
Try it out
With your tools configured, you’ll be able to include PagerDuty links in your prompts, and the LLM will use those tools to gather context before answering:
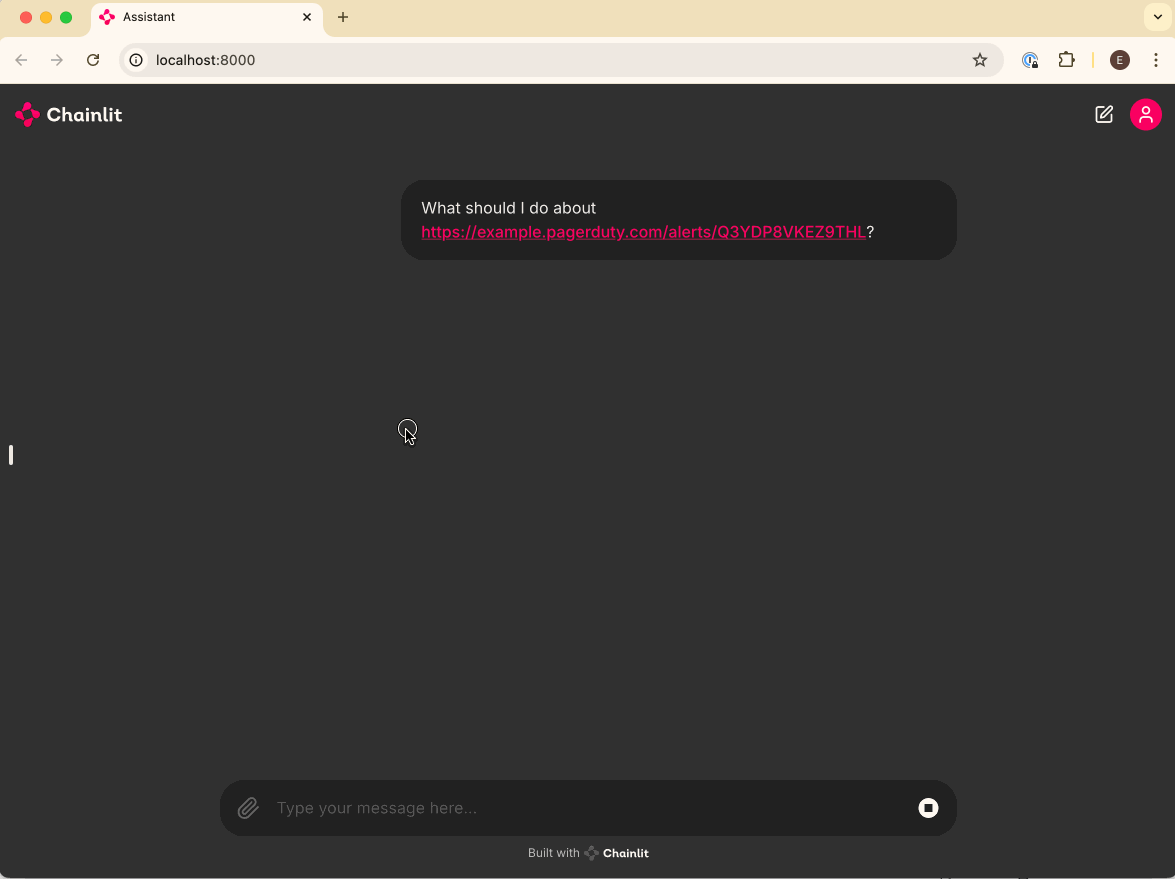
🧑💻 Here's the complete code:
from datetime import datetime, timedelta
import json
import os
from pathlib import Path
from typing import override
import chainlit as cl

from openai import AsyncOpenAI, AsyncAssistantEventHandler
from openai.types.beta.threads import Message, TextDelta, Text
from openai.types.beta import AssistantStreamEvent
from openai.types.beta.threads.runs.tool_call import ToolCall
from openai.types.beta.threads import Run


##
# Settings
#
try:
    OPENAI_API_KEY = os.environ["OPENAI_API_KEY"]
except KeyError as ex:
    raise LookupError(f"Missing required environment variable: {ex}")

# Give your assistant a name.
OPENAI_ASSISTANT_NAME = "roger"

# Give your assistant some custom instructions.
OPENAI_ASSISTANT_INSTRUCTIONS = """
You are an expert Site Reliability Engineer, tasked with helping
the SRE team respond to and resolve incidents.

If you are presented with a question that does not seem like it
could be related to infrastructure, begin your response with a polite
reminder that your primary responsibilities are to help with incident
response, before fully answering the question to the best of your ability.

Use the provided tools to gather additional context about the incident, if
applicable.
"""


client = AsyncOpenAI(api_key=OPENAI_API_KEY)


class MessageEventHandler(AsyncAssistantEventHandler):
    """An event handler for updating a Chainlit message while streaming an OpenAI response."""

    message: cl.Message

    @override
    async def on_text_created(self, text: Text) -> None:
        """Create a new message so that we can update it."""
        self.message = cl.Message(content="")
        await self.message.send()

    @override
    async def on_text_delta(self, delta: TextDelta, snapshot: Text) -> None:
        """Update the message with the latest text delta streamed to us."""
        await self.message.stream_token(delta.value)

    @override
    async def on_message_done(self, message: Message) -> None:
        """Update the message with the final text when the stream completes."""
        await self.message.update()

    @override
    async def on_tool_call_created(self, tool_call: ToolCall) -> None:
        """Create a new step in the conversation to indicate that a tool is being used."""
        async with cl.Step(tool_call.type) as step:
            self.step = step

    @override
    async def on_event(self, event: AssistantStreamEvent) -> None:
        """Handle specific events."""
        if event.event == "thread.run.requires_action":
            run_id = event.data.id  # Retrieve the run ID from the event data
            self.current_run.id = run_id
            await self.handle_requires_action(event.data, run_id)

    async def handle_requires_action(self, run: Run, run_id: str) -> None:
        """Handle events that require an action to be taken, like tool calls."""
        tool_outputs = []

        # Execute each tool call and collect the result.
        for tool in run.required_action.submit_tool_outputs.tool_calls:
            func_name = tool.function.name
            func_args = tool.function.arguments

            # TODO: Build a function map with a decorator instead of looking up
            # functions in globals.
            if func_to_call := globals()[func_name]:
                try:
                    # Parse the func_args JSON string to a dictionary
                    tool_outputs.append(
                        {
                            "tool_call_id": tool.id,
                            "output": await func_to_call(**json.loads(func_args)),
                        }
                    )
                except TypeError as ex:
                    print(f"Error calling function {func_name!r}: {str(ex)}")
            else:
                print(f"Function {func_name!r} not found")

        # Submit tool outputs to the conversation thread.
        async with client.beta.threads.runs.submit_tool_outputs_stream(
            thread_id=self.current_run.thread_id,
            run_id=run_id,
            tool_outputs=tool_outputs,
            event_handler=MessageEventHandler(),
        ) as stream:
            await stream.until_done()


@cl.on_chat_start
async def handle_chat_start() -> str:
    vector_store = None

    # Try to find an existing vector store so we don't create duplicates.
    async for existing_vector_store in await client.beta.vector_stores.list():
        if existing_vector_store.name == OPENAI_ASSISTANT_NAME:
            vector_store = existing_vector_store
            break

    # Create a vector store if we didn't find an existing one.
    vector_store = vector_store or await client.beta.vector_stores.create(
        name=OPENAI_ASSISTANT_NAME,
    )

    if documents := list(Path("./docs").glob("**/*.md")):
        await client.beta.vector_stores.file_batches.upload_and_poll(
            vector_store_id=vector_store.id,
            files=(f.open("rb") for f in documents),
        )

    assistant = None

    # Try to find an existing assistant so we don't create duplicates.
    async for existing_assistant in await client.beta.assistants.list():
        if existing_assistant.name == OPENAI_ASSISTANT_NAME:
            assistant = existing_assistant
            break

    # Create an assistant if we didn't find an existing one.
    assistant = assistant or await client.beta.assistants.create(
        name=OPENAI_ASSISTANT_NAME,
        model="gpt-4o",
    )

    # Update the assistant so that it always has the latest instructions
    assistant = await client.beta.assistants.update(
        assistant_id=assistant.id,
        instructions=OPENAI_ASSISTANT_INSTRUCTIONS,
        tools=[
            # Our existing file search tool
            {"type": "file_search"},
            # Our new pagerduty alert tool
            {
                "type": "function",
                "function": {
                    "name": get_pagerduty_alert_details.__name__,
                    "description": get_pagerduty_alert_details.__doc__,
                    "parameters": {
                        "type": "object",
                        "properties": {
                            "pagerduty_alert_url": {
                                "type": "string",
                                "format": "uri",
                                "description": "The PagerDuty alert URL. For example, 'https://example.pagerduty.com/alerts/Q3YDP8VKEZ9THL'.",
                            },
                        },
                        "required": ["pagerduty_alert_url"],
                        "additionalProperties": False,
                    },
                },
            },
        ],
        tool_resources={
            "file_search": {
                "vector_store_ids": [vector_store.id],
            }
        },
    )

    # Create a thread for the conversation
    thread = await client.beta.threads.create()

    # Add the assistant and the new thread to the user session so that
    # we can reference it in other handlers.
    cl.user_session.set("assistant", assistant)
    cl.user_session.set("thread", thread)


@cl.on_message
async def handle_message(message: cl.Message) -> None:
    # Retrieve our Assistant and Thread from our user session.
    assistant = cl.user_session.get("assistant")
    thread = cl.user_session.get("thread")

    # Add the latest message to the thread.
    await client.beta.threads.messages.create(
        thread_id=thread.id,
        role="user",
        content=message.content,
    )

    # Stream a response to the Thread (called a "Run") using our Assistant.
    async with client.beta.threads.runs.stream(
        assistant_id=assistant.id,
        thread_id=thread.id,
        # Use our custom message handler.
        event_handler=MessageEventHandler(),
    ) as stream:
        await stream.until_done()


async def get_pagerduty_alert_details(pagerduty_alert_url: str) -> dict:
    """Return the details of the PagerDuty alert at the given URL."""
    # TODO: Make this implementation real!
    return json.dumps(
        {
            "alert": {
                "id": "PT4KHLK",
                "type": "alert",
                "summary": "A customer database is experiencing high CPU usage.",
                "self": pagerduty_alert_url,
                "html_url": pagerduty_alert_url,
                "created_at": (datetime.now() - timedelta(minutes=5)).isoformat(),
                "status": "resolved",
                "alert_key": "baf7cf21b1da41b4b0221008339ff357",
                "suppressed": False,
                "severity": "critical",
            }
        }
    )
Now you're all set to build a useful AI Agent for your SRE team! If you have any questions about anything we've covered in this guide, please reach out, and we'll be happy to help. In the meantime, if there is anything missing or any other AI Agent-related thing you'd like to learn, let us know!
Give your Agent access to your documentation
Now that we’re using Assistants and Threads, we can start customizing behavior. To start, we’ll give our Assistant access to some of our internal documentation so that it can provide responses that are more tailored to our use case.
The Goal
By the end of this section, you’ll have given your bot the ability to search a collection of files (e.g., your SRE runbooks and other internal documentation) when responding to prompts.
For simplicity, we’ll implement this as a folder full of files that get uploaded into a vector store and provided to our Assistant.
Creating a Vector Store
The first thing we need to do is create a vector store and provide it to our Assistant.
First, update the beginning of our handle_chat_start function to include the following:
# ...
@cl.on_chat_start
async def handle_chat_start() -> str:
    vector_store = None
    # Try to find an existing vector store so we don't create duplicates.
    async for existing_vector_store in await client.beta.vector_stores.list():
        if existing_vector_store.name == OPENAI_ASSISTANT_NAME:
            vector_store = existing_vector_store
            break
    # Create a vector store if we didn't find an existing one.
    vector_store = vector_store or await client.beta.vector_stores.create(
        name=OPENAI_ASSISTANT_NAME,
    )

    assistant = None
    # ...
# ...
Next, update the call to client.beta.assistants.update() to give the assistant access to the vector store and enable the file_search tool.
assistant = await client.beta.assistants.update(
    assistant_id=assistant.id,
    instructions=OPENAI_ASSISTANT_INSTRUCTIONS,
    tools=[{"type": "file_search"}],
    tool_resources={
        "file_search": {
            "vector_store_ids": [vector_store.id],
        }
    },
)
Upload Documentation
Finally, we’ll need to upload our documentation that we want our assistant to reference when answering prompts.
First, we’ll need to create a folder where we’ll put our documents:
mkdirNext, we’ll collect our documentation and put it in that folder. For testing purposes, I’ve added the following fake document to my folder:
---
title: SRE Runbook
url: <https://internal.aptible.com/docs/runbooks/sre>
Finally, we’ll update our handle_chat_start function to automatically upload our documents to the vector store we created earlier. Add the following code just after where we create the vector store:
if documents := list(Path("./docs").glob("**/*.md")):
  await client.beta.vector_stores.file_batches.upload_and_poll(
      vector_store_id=vector_store.id,
      files=(f.open("rb") for f in documents),
  )
ℹ️ Note:
For now, we’ll only support
.mdfiles, but OpenAI supports lots of different file types, so feel free to update the glob pattern to whatever makes sense for your use case!
This will automatically upload all of the files in the ./docs folder and add them to our vector store.
Add an indicator
File search can sometimes take a while, especially for larger datasets. In those cases, you’ll probably want to let the user know what’s going on so they don’t get frustrated.
Luckily, Chainlit makes this easy by providing a Step class that we can use to tell the user that something’s happening in the background. We can use the Step class in conjunction with the MessageEventHandler we built earlier, and add an indicator any time a tool is called.
Add the following to your MessageEventHandler:
class MessageEventHandler(AsyncAssistantEventHandler):
    # ...

    @override
    async def on_tool_call_created(self, tool_call: ToolCall) -> None:
        """Create a new step in the conversation to indicate that a tool is being used."""
        async with cl.Step(tool_call.type) as step:
            self.step = step
Try it out
Now that you’ve uploaded some of your own documentation, try asking some questions that are more specific to your use case, and see what you get!
For our test case, it correctly referenced our runbook when asked about high CPU utilization on a customer database:
🧑💻 For reference, here's the complete code so far:
import os
from pathlib import Path
from typing import override
import chainlit as cl

from openai import AsyncOpenAI, AsyncAssistantEventHandler
from openai.types.beta.threads import Message, TextDelta, Text
from openai.types.beta.threads.runs.tool_call import ToolCall

##
# Settings
#
try:
    OPENAI_API_KEY = os.environ["OPENAI_API_KEY"]
except KeyError as ex:
    raise LookupError(f"Missing required environment variable: {ex}")

# Give your assistant a name.
OPENAI_ASSISTANT_NAME = "roger"

# Give your assistant some custom instructions.
OPENAI_ASSISTANT_INSTRUCTIONS = """
You are an expert Site Reliability Engineer, tasked with helping
the SRE team respond to and resolve incidents.

If you are presented with a question that does not seem like it
could be related to infrastructure, begin your response with a polite
reminder that your primary responsibilities are to help with incident
response, before fully answering the question to the best of your ability.
"""

client = AsyncOpenAI(api_key=OPENAI_API_KEY)

class MessageEventHandler(AsyncAssistantEventHandler):
    """An event handler for updating a Chainlit message while streaming an OpenAI response."""

    message: cl.Message

    @override
    async def on_text_created(self, text: Text) -> None:
        """Create a new message so that we can update it."""
        self.message = cl.Message(content="")
        await self.message.send()

    @override
    async def on_text_delta(self, delta: TextDelta, snapshot: Text) -> None:
        """Update the message with the latest text delta streamed to us."""
        await self.message.stream_token(delta.value)

    @override
    async def on_message_done(self, message: Message) -> None:
        """Update the message with the final text when the stream completes."""
        await self.message.update()

    @override
    async def on_tool_call_created(self, tool_call: ToolCall) -> None:
        """Create a new step in the conversation to indicate that a tool is being used."""
        async with cl.Step(tool_call.type) as step:
            self.step = step

@cl.on_chat_start
async def handle_chat_start() -> str:
    vector_store = None

    # Try to find an existing vector store so we don't create duplicates.
    async for existing_vector_store in await client.beta.vector_stores.list():
        if existing_vector_store.name == OPENAI_ASSISTANT_NAME:
            vector_store = existing_vector_store
            break

    # Create a vector store if we didn't find an existing one.
    vector_store = vector_store or await client.beta.vector_stores.create(
        name=OPENAI_ASSISTANT_NAME,
    )

    if documents := list(Path("./docs").glob("**/*.md")):
        await client.beta.vector_stores.file_batches.upload_and_poll(
            vector_store_id=vector_store.id,
            files=(f.open("rb") for f in documents),
        )

    assistant = None

    # Try to find an existing assistant so we don't create duplicates.
    async for existing_assistant in await client.beta.assistants.list():
        if existing_assistant.name == OPENAI_ASSISTANT_NAME:
            assistant = existing_assistant
            break

    # Create an assistant if we didn't find an existing one.
    assistant = assistant or await client.beta.assistants.create(
        name=OPENAI_ASSISTANT_NAME,
        model="gpt-4o",
    )

    # Update the assistant so that it always has the latest instructions
    assistant = await client.beta.assistants.update(
        assistant_id=assistant.id,
        instructions=OPENAI_ASSISTANT_INSTRUCTIONS,
        tools=[{"type": "file_search"}],
        tool_resources={
            "file_search": {
                "vector_store_ids": [vector_store.id],
            }
        },
    )

    # Create a thread for the conversation
    thread = await client.beta.threads.create()

    # Add the assistant and the new thread to the user session so that
    # we can reference it in other handlers.
    cl.user_session.set("assistant", assistant)
    cl.user_session.set("thread", thread)

@cl.on_message
async def handle_message(message: cl.Message) -> None:
    # Retrieve our Assistant and Thread from our user session.
    assistant = cl.user_session.get("assistant")
    thread = cl.user_session.get("thread")

    # Add the latest message to the thread.
    await client.beta.threads.messages.create(
        thread_id=thread.id,
        role="user",
        content=message.content,
    )

    # Stream a response to the Thread (called a "Run") using our Assistant.
    async with client.beta.threads.runs.stream(
        assistant_id=assistant.id,
        thread_id=thread.id,
        # Use our custom message handler.
        event_handler=MessageEventHandler(),
    ) as stream:
        await stream.until_done()
Integrate your agent with external tools
Our Agent is now able to retrieve data from our curated internal documentation, which is useful if you have good documentation. However, a lot of time in incident management is often spent investigating things that aren’t covered by the docs: scanning alerts, reading logs, interpreting metrics, etc.
For those things, we want to give our assistant the ability to call external APIs — and more broadly, execute functions that we define — so that it can gather more context on an as-needed basis.
To do this, we’ll leverage the “function calling” capabilities of the model to execute functions that we define.
The Goal
By the end of this step, you’ll have given your bot the ability to use an external tool (a fake PagerDuty tool) to retrieve information when answering prompts.
Define the (fake) Tool
First, let’s add a new function to our app.py called get_pagerduty_alert_details.
import json
from datetime import datetime, timedelta

# ...

async def get_pagerduty_alert_details(pagerduty_alert_url: str) -> dict:
    """Return the details of the PagerDuty alert at the given URL."""
    # TODO: Make this implementation real!
    return json.dumps({
        "alert": {
            "id": "PT4KHLK",
            "type": "alert",
            "summary": "A customer database is experiencing high CPU usage.",
            "self": pagerduty_alert_url,
            "html_url": pagerduty_alert_url,
            "created_at": (datetime.now() - timedelta(minutes=5)).isoformat(),
            "status": "resolved",
            "alert_key": "baf7cf21b1da41b4b0221008339ff357",
            "suppressed": False,
            "severity": "critical",
        }
    })
Tell the LLM how to use it
Next, we need to tell the LLM how to call our tool. OpenAI expects tool definitions in JSONSchema format.
Update your call to client.beta.assistants.update() to include a new tool definition after the file_search tool that we already have.
assistant = await client.beta.assistants.update(
    assistant_id=assistant.id,
    instructions=OPENAI_ASSISTANT_INSTRUCTIONS,
    tools=[
        # Our existing file search tool
        {"type": "file_search"},
        # Our new pagerduty alert tool
        {
            "type": "function",
            "function": {
                "name": get_pagerduty_alert_details.__name__,
                "description": get_pagerduty_alert_details.__doc__,
                "parameters": {
                    "type": "object",
                    "properties": {
                        "pagerduty_alert_url": {
                            "type": "string",
                            "format": "uri",
                            "description": "The PagerDuty alert URL. For example, '<https://example.pagerduty.com/alerts/Q3YDP8VKEZ9THL>'.",
                        },
                    },
                    "required": ["pagerduty_alert_url"],
                    "additionalProperties": False,
                },
            }
        }
    ],
    tool_resources={
        "file_search": {
            "vector_store_ids": [vector_store.id],
        }
    },
)
Update the message handler to handle tool calls
Our MessageEventHandler currently handles back-and-forth message events, but calling tools requires some special handling.
When responding to your prompt, the LLM will decide which tools it should call (if any) and return to you one or more “tool call” definitions in the response payload, and tell you that the response “requires action”. In order to actually execute the function, we need to handle these “requires action” responses.
We can do this by updating our MessageEventHandler class to implement the on_event method, along with a new handle_requires_action method for executing our function call and adding the result to the running thread:
from openai.types.beta import AssistantStreamEvent
from openai.types.beta.threads import Run

# ...

class MessageEventHandler(AsyncAssistantEventHandler):
    # ...

    @override
    async def on_event(self, event: AssistantStreamEvent) -> None:
        """Handle specific events."""
        if event.event == "thread.run.requires_action":
            run_id = event.data.id  # Retrieve the run ID from the event data
            self.current_run.id = run_id
            await self.handle_requires_action(event.data, run_id)

    async def handle_requires_action(self, run: Run, run_id: str) -> None:
        """Handle events that require an action to be taken, like tool calls."""
        tool_outputs = []

        # Execute each tool call and collect the result.
        for tool in run.required_action.submit_tool_outputs.tool_calls:
            func_name = tool.function.name
            func_args = tool.function.arguments

            # TODO: Build a function map with a decorator instead of looking up
            # functions in globals.
            if func_to_call := globals()[func_name]:
                try:
                    # Parse the func_args JSON string to a dictionary
                    tool_outputs.append(
                        {
                            "tool_call_id": tool.id,
                            "output": await func_to_call(**json.loads(func_args)),
                        }
                    )
                except TypeError as ex:
                    print(f"Error calling function {func_name!r}: {str(ex)}")
            else:
                print(f"Function {func_name!r} not found")

        # Submit tool outputs to the conversation thread.
        async with client.beta.threads.runs.submit_tool_outputs_stream(
            thread_id=self.current_run.thread_id,
            run_id=run_id,
            tool_outputs=tool_outputs,
            event_handler=MessageEventHandler(),
        ) as stream:
            await stream.until_done()

    # ...
Tweak the prompt
It can often be helpful to remind the LLM that it should attempt to use the tools you’ve provided when applicable. Add a line like this one to the end of your prompt:
Use the provided tools to gather additional context about the incident, if applicable.
Try it out
With your tools configured, you’ll be able to include PagerDuty links in your prompts, and the LLM will use those tools to gather context before answering:
🧑💻 Here's the complete code:
from datetime import datetime, timedelta
import json
import os
from pathlib import Path
from typing import override
import chainlit as cl

from openai import AsyncOpenAI, AsyncAssistantEventHandler
from openai.types.beta.threads import Message, TextDelta, Text
from openai.types.beta import AssistantStreamEvent
from openai.types.beta.threads.runs.tool_call import ToolCall
from openai.types.beta.threads import Run


##
# Settings
#
try:
    OPENAI_API_KEY = os.environ["OPENAI_API_KEY"]
except KeyError as ex:
    raise LookupError(f"Missing required environment variable: {ex}")

# Give your assistant a name.
OPENAI_ASSISTANT_NAME = "roger"

# Give your assistant some custom instructions.
OPENAI_ASSISTANT_INSTRUCTIONS = """
You are an expert Site Reliability Engineer, tasked with helping
the SRE team respond to and resolve incidents.

If you are presented with a question that does not seem like it
could be related to infrastructure, begin your response with a polite
reminder that your primary responsibilities are to help with incident
response, before fully answering the question to the best of your ability.

Use the provided tools to gather additional context about the incident, if
applicable.
"""


client = AsyncOpenAI(api_key=OPENAI_API_KEY)


class MessageEventHandler(AsyncAssistantEventHandler):
    """An event handler for updating a Chainlit message while streaming an OpenAI response."""

    message: cl.Message

    @override
    async def on_text_created(self, text: Text) -> None:
        """Create a new message so that we can update it."""
        self.message = cl.Message(content="")
        await self.message.send()

    @override
    async def on_text_delta(self, delta: TextDelta, snapshot: Text) -> None:
        """Update the message with the latest text delta streamed to us."""
        await self.message.stream_token(delta.value)

    @override
    async def on_message_done(self, message: Message) -> None:
        """Update the message with the final text when the stream completes."""
        await self.message.update()

    @override
    async def on_tool_call_created(self, tool_call: ToolCall) -> None:
        """Create a new step in the conversation to indicate that a tool is being used."""
        async with cl.Step(tool_call.type) as step:
            self.step = step

    @override
    async def on_event(self, event: AssistantStreamEvent) -> None:
        """Handle specific events."""
        if event.event == "thread.run.requires_action":
            run_id = event.data.id  # Retrieve the run ID from the event data
            self.current_run.id = run_id
            await self.handle_requires_action(event.data, run_id)

    async def handle_requires_action(self, run: Run, run_id: str) -> None:
        """Handle events that require an action to be taken, like tool calls."""
        tool_outputs = []

        # Execute each tool call and collect the result.
        for tool in run.required_action.submit_tool_outputs.tool_calls:
            func_name = tool.function.name
            func_args = tool.function.arguments

            # TODO: Build a function map with a decorator instead of looking up
            # functions in globals.
            if func_to_call := globals()[func_name]:
                try:
                    # Parse the func_args JSON string to a dictionary
                    tool_outputs.append(
                        {
                            "tool_call_id": tool.id,
                            "output": await func_to_call(**json.loads(func_args)),
                        }
                    )
                except TypeError as ex:
                    print(f"Error calling function {func_name!r}: {str(ex)}")
            else:
                print(f"Function {func_name!r} not found")

        # Submit tool outputs to the conversation thread.
        async with client.beta.threads.runs.submit_tool_outputs_stream(
            thread_id=self.current_run.thread_id,
            run_id=run_id,
            tool_outputs=tool_outputs,
            event_handler=MessageEventHandler(),
        ) as stream:
            await stream.until_done()


@cl.on_chat_start
async def handle_chat_start() -> str:
    vector_store = None

    # Try to find an existing vector store so we don't create duplicates.
    async for existing_vector_store in await client.beta.vector_stores.list():
        if existing_vector_store.name == OPENAI_ASSISTANT_NAME:
            vector_store = existing_vector_store
            break

    # Create a vector store if we didn't find an existing one.
    vector_store = vector_store or await client.beta.vector_stores.create(
        name=OPENAI_ASSISTANT_NAME,
    )

    if documents := list(Path("./docs").glob("**/*.md")):
        await client.beta.vector_stores.file_batches.upload_and_poll(
            vector_store_id=vector_store.id,
            files=(f.open("rb") for f in documents),
        )

    assistant = None

    # Try to find an existing assistant so we don't create duplicates.
    async for existing_assistant in await client.beta.assistants.list():
        if existing_assistant.name == OPENAI_ASSISTANT_NAME:
            assistant = existing_assistant
            break

    # Create an assistant if we didn't find an existing one.
    assistant = assistant or await client.beta.assistants.create(
        name=OPENAI_ASSISTANT_NAME,
        model="gpt-4o",
    )

    # Update the assistant so that it always has the latest instructions
    assistant = await client.beta.assistants.update(
        assistant_id=assistant.id,
        instructions=OPENAI_ASSISTANT_INSTRUCTIONS,
        tools=[
            # Our existing file search tool
            {"type": "file_search"},
            # Our new pagerduty alert tool
            {
                "type": "function",
                "function": {
                    "name": get_pagerduty_alert_details.__name__,
                    "description": get_pagerduty_alert_details.__doc__,
                    "parameters": {
                        "type": "object",
                        "properties": {
                            "pagerduty_alert_url": {
                                "type": "string",
                                "format": "uri",
                                "description": "The PagerDuty alert URL. For example, 'https://example.pagerduty.com/alerts/Q3YDP8VKEZ9THL'.",
                            },
                        },
                        "required": ["pagerduty_alert_url"],
                        "additionalProperties": False,
                    },
                },
            },
        ],
        tool_resources={
            "file_search": {
                "vector_store_ids": [vector_store.id],
            }
        },
    )

    # Create a thread for the conversation
    thread = await client.beta.threads.create()

    # Add the assistant and the new thread to the user session so that
    # we can reference it in other handlers.
    cl.user_session.set("assistant", assistant)
    cl.user_session.set("thread", thread)


@cl.on_message
async def handle_message(message: cl.Message) -> None:
    # Retrieve our Assistant and Thread from our user session.
    assistant = cl.user_session.get("assistant")
    thread = cl.user_session.get("thread")

    # Add the latest message to the thread.
    await client.beta.threads.messages.create(
        thread_id=thread.id,
        role="user",
        content=message.content,
    )

    # Stream a response to the Thread (called a "Run") using our Assistant.
    async with client.beta.threads.runs.stream(
        assistant_id=assistant.id,
        thread_id=thread.id,
        # Use our custom message handler.
        event_handler=MessageEventHandler(),
    ) as stream:
        await stream.until_done()


async def get_pagerduty_alert_details(pagerduty_alert_url: str) -> dict:
    """Return the details of the PagerDuty alert at the given URL."""
    # TODO: Make this implementation real!
    return json.dumps(
        {
            "alert": {
                "id": "PT4KHLK",
                "type": "alert",
                "summary": "A customer database is experiencing high CPU usage.",
                "self": pagerduty_alert_url,
                "html_url": pagerduty_alert_url,
                "created_at": (datetime.now() - timedelta(minutes=5)).isoformat(),
                "status": "resolved",
                "alert_key": "baf7cf21b1da41b4b0221008339ff357",
                "suppressed": False,
                "severity": "critical",
            }
        }
    )
Now you're all set to build a useful AI Agent for your SRE team! If you have any questions about anything we've covered in this guide, please reach out, and we'll be happy to help. In the meantime, if there is anything missing or any other AI Agent-related thing you'd like to learn, let us know!

Don't want to build your own? Try Aptible AI.

Don't want to build your own? Try Aptible AI.
Don't want to build your own? Try Aptible AI.